14 best ho electric trains
HO Electric Trains
1. Introduction HO scale trains, which stand for "Half O," is a popular scale for model railroading. The scale represents 1/87.1 of full size, making it approximately half the size of the O scale, which is 1/48.
2. Popularity The HO scale is one of the most popular scales worldwide for model railroading. Its moderate size allows for a substantial layout in a more confined space compared to larger scales. The scale is also popular due to a wide variety of available rolling stock, track configurations, and accessories.
3. Rolling Stock Rolling stock refers to the vehicles that move on the railway tracks. For HO trains, these can include:
- Locomotives: Steam, Diesel, and Electric models.
- Passenger cars: Coaches, sleepers, baggage cars, etc.
- Freight cars: Box cars, tankers, hoppers, and more.
- Specialty cars: Crane cars, caboose, maintenance cars, and others.
4. Track Configurations HO scale track comes in various configurations and types:
- Straight and curved tracks
- Turnouts (switches)
- Crossings
- Specialized tracks like rerailers and buffers
There are also various track codes which refer to the height of the rails, with Code 100 and Code 83 being quite common. Some modelers prefer one over the other for visual or operational reasons.
5. Accessories A significant part of the appeal of model railroading is the ability to create detailed and realistic scenes. For HO scale, this means a plethora of accessories:
- Buildings: Stations, houses, factories, shops, and more.
- Vehicles: Cars, trucks, buses, etc.
- Figures: People in various poses, animals.
- Scenery: Trees, bushes, water features, tunnels, bridges, and more.
- Lighting: Street lights, building interiors, signals.
- Diorama materials: Ground cover, ballast, grass, and more.
6. Powering HO Trains The most traditional way to power an HO train set is through a direct current (DC) system. With this method, voltage is applied to the tracks, and the speed and direction of the train are controlled by varying the voltage and polarity.
However, the Digital Command Control (DCC) system has gained significant popularity. With DCC, individual locomotives are equipped with decoders, allowing multiple trains to be controlled independently on the same track. This adds a level of realism and flexibility.
7. Brands and Manufacturers There are many companies producing HO scale trains and accessories. Some of the leading names include Bachmann, Athearn, Marklin, Walthers, and Hornby. Each offers a unique line of products catering to different tastes and budgets.
8. Getting Started For beginners, starter sets are often a good choice. They typically include a locomotive, a few cars, a circle or oval of track, and a power pack. Over time, enthusiasts can expand their setup by purchasing additional tracks, rolling stock, and scenery.
In conclusion, HO electric trains offer an engaging and versatile hobby for individuals of all ages. The extensive variety of trains and accessories available provides enthusiasts with endless possibilities for customization and expansion.Whether you're just getting started or you're an experienced modeler, the world of HO scale railroading has something for everyone.
Below you can find our editor's choice of the best ho electric trains on the market
The Subtle Art of Not Giving a F*ck: A Counterintuitive Approach to Living a Good Life

Unfu*k Yourself: Get Out of Your Head and into Your Life

Funko Pop! Keychain: Fortnite - Drift Toy, Multicolor
3 months - 8 years
Product description
Limited Edition
- From Fortnite, drift, as a stylized Pocket POP Keychain from Funko!
- Stylized collectable keychain stands 1 1/2 inches tall, perfect for any Fortnite fan!
- Take drift wherever you go!

Bachmann Trains - Chattanooga Ready To Run 155 Piece Electric Train Set - HO Scale
Bachmann Trains
Product description
Chattanooga Ready To Run Electric Train Set - HO Scale. Capturing all the energy and excitement of train travel is the Chattanooga. Named for the famous Nashville, Chattanooga & St. Louis Railroad, this 155-piece set includes all the miniature people, buildings, and structures you'll need to recreate the romance of the steam era. View video to see the set in action. This ready-to-run train set includes: 0-6-0 steam locomotive and tender with operating smoke and headlight, plug-door box car, open quad hopper, single-dome tank car, offset cupola caboose, body-mounted E-Z Mate couplers, 47" x 38" oval of snap-fit E-Z Track, including 12 pieces of curved track, 1 piece of straight track, and 1 plug-in terminal rerailer, suburban station, signal bridge, 48 railroad and street signs, 36 telephone poles, 48 assorted figures, power pack and speed controller, illustrated instruction manual.
It's the romance of the train--in a box. This electric train set has a replica of an old steam locomotive with a working headlight and an active smokestack (just drop some of the included "smoke liquid" into the funnel). Linked together, the beautifully detailed locomotive and the coal tender are 9 inches long. Also trailing along are two railcars, a Penn Salt tanker car, and a red caboose. The snap-together E-Z Track pieces form an oval-shaped track that is 47 inches long by 38 inches wide. The set also contains telephone poles, a signal bridge, a station, railroad and street signs, a power pack with forward, reverse, and speed controls, and an instructional video. --Richard Farr
From the Manufacturer
Capturing all the energy and excitement of train travel is the Chattanooga. Named for the famous Nashville, Chattanooga and St. Louis Railroad this 155-piece set includes all the miniature people, buildings, and structures you will need to recreate the romance of the steam era.
- Complete Ready To Run 155 Piece Freight Train Set
- Powered by a 0-6-0 Steam Era Locomotive and Tender with Operating Smoke and Headlight
- Includes; Plug Door Box Car, Open Quad Hopper Car, Single-Dome Tank Car, Off-Set Cupola Caboose, Suburban Station, Signal Bridge, Miniature Figures, Railroad Signs, Street Signs, and Telephone Poles
- 47" x 38" Oval of Snap-Fit E-Z Track, Power Pack and Speed Controller
- HO Scale 1:87
User questions & answers
| Question: | Is the track steel or nickle silver |
| Answer: | I don't really recall but it would not stay together and the train connections sucked. The would not stay together or on the track anyway. I returned it |
| Question: | Are the cars wheels plastic |
| Answer: | Yes, all plastic but the engine. The wheels on the rest of the cars were falling off when I took it out of the box. Returned it immediately. Complete piece of junk. |
| Question: | does this set come with an under track magnet for operating the couplers |
| Answer: | No and I advise against this purchase. It is junk.... |
| Question: | What is bigger? HO or N |
| Answer: | HO Scale. |
Product features
Discover Everything Bachmann Trains Offers to Get Started in Model Railroading
Since 1833, Bachmann has been known for providing innovative design at a good value. We are now one of the world's largest distributor, by volume, of ready-to-run train sets, locomotives, track, and accessories. Bachmann is also the only train company to offer products in all five of the most popular scales: N, HO, On30, O, and Large Scale.
As a distributor of beloved Thomas & Friends products, Bachmann brings the adventures of Thomas the Tank Engine to life with a growing line of complete train sets, separate sale items, and accessories for children from 8 to 80-just add your imagination. Thomas & Friends is available in both HO and Large Scale.
Bachmann's exclusive snap-together E-Z Track System makes track setup quick, easy, and fun. Plasticville U.S.A. and SceneScapes buildings and accessories let you add the finishing touches for the perfect layout.
If You Are Purchasing a Train Set, It Will Include
- Locomotive
- Cars (Rolling Stock)
- E-Z Track – available in either black roadbed with steel alloy rail or gray roadbed with nickel silver rail
- Terminal/Rerailer
- Terminal Wire
- Speed Controller
- Power Supply
- List of Components
Track Assembly
- Decide where to set up your train – a dry, firm, flat surface works best!
- To make sure you have enough working room, make a test track layout by loosely placing track in desired configuration.
- The terminal/rerailer section will later be connected to a power pack and power supply, so place it near an outlet or power strip.
- Install under-track magnet, if your set comes with one. If your set does not come with one, magnets are available separately (HO Item No. 78999; N Scale Item No. 78998).
- Assemble the track by pushing together. Make sure the rail and joiners are seated properly. Be careful that the rail joiners do not slip under the rail without properly connecting. This can cause train derailments and electrical circuit interruptions.
- After track is assembled, double-check for joint connection and fit by lightly running your fingers over the top of the rails in both directions.
- If you detect bumps or distortion on the track surface, recheck the rail joiner fit.
Power Connections
- Power supply and speed control are plug and play; no tools are needed.
- Power is supplied to the track and the locomotive by the power supply, speed controller, terminal wire, and E-Z Track terminal/rerailer.
- First – turn knob on the speed controller counterclockwise until it stops (all the way to the left).
- Next – attach terminal wire to the speed controller by plugging it in where it says 'To Track.'
- Then – plug terminal wire into the E-Z Track terminal rerailer. Firmly push connector onto the track terminals.
- Finally – plug the connecting wire from the power supply into jack on the speed controller labeled 'In.' Then plug power supply into a live wall outlet.
- Some sets may come with a speed controller with two push button connectors. These are used to supply AC power to accessories.
- To make positive and secure connections to these, push in buttons and insert each of the bare ends of the connection wire from your accessory.
- The speed controller is capable of powering one accessory at a time.
Putting the Train on the Track
- Put the locomotive on the track and run the wheels back and forth over the terminal rerailer track.
- When the wheels glide smoothly over the track, you know the wheels are all on the track. If your set comes with a tender, attach it to the locomotive.
- Add the rest of the cars that come with your set by placing them on the track and running them back and forth over the terminal rerailer until they glide smoothly. Then gently push the cars together – they will engage automatically.
- Do not try to connect cars when positioned over an under-track magnet.
How to Use E-Z Mate Couplers (HO and On30 Scale)
- Your set may be equipped with E-Z Mate magnetically operated knuckle couplers that let you perform real railroad switching and yard operations.
- Coupling two cars with E-Z Mate couplers is as easy as pushing them together when they are not over an under-track magnet.
- Uncoupling occurs only when over an under-track magnet and when there is no tension between the cars.
- To uncouple E-Z Mate couplers, stop two couplers directly over the under-track magnet. With no tension between the cars, the couplers will open automatically.
- If cars will not couple, check to be sure cars are not positioned over the uncoupling magnet or parked on a curve.
- If cars will not uncouple, check to be sure the couplers are positioned directly adjacent to the magnet position indicator and that the indicator is placed in line with the center line of the under-track magnet.
- Check that the magnet is secured to the underside of the track and fitted with the steel plate provided.
How to Run Your Train
- Turn the knob on the speed controller clockwise until it stops (all the way to the left).
- Plug in the power supply.
- Begin feeding power to the track by slowly turning the knob on the speed controller clockwise.
- Observe the direction of your train.
- If it moves backwards when the controls indicate forward, stop the train.
- Then simply disconnect, flip, and reconnect the terminal wire to the terminal rerailer track.
- Remember – never leave your train running unattended!
Action Checklist (Troubleshooting If Your Train Doesn’t Run or Stops Running)
- Is the power supply plugged in to a live receptacle?
- Are the wheels on the track?
- Is the wiring secure?
- Is the track properly assembled?
- Is the track properly seated in the rail joiner?
- If your train stops or fails to start, a short circuit may be indicated. If this is the case, Unplug The Power Supply Immediately.
- Common reasons for a short circuit: derailed wheels may cause a short. Check to make sure all wheels are on the track. Also check all connections and make sure there is no metal of any sort across the rails.
- After checking everything carefully, resume operation.
- Please note, your power supply is protected by a circuit breaker that automatically resets after a short circuit is corrected.
- Allow up to 5 minutes for the circuit breaker to reset before resuming operation.
Keep Your Train in Top Operating Condition
- Works better after couple hours of break-in time.
- Train performs best under clean operating conditions.
- Clean wheels and a clean track ensure good electrical contact.
- After about every 8 hours of operation, wipe the track rails and exposed wheels with a soft, lint-free cloth.
- Removal of black residue is normal.
- Do Not Use Steel Wool To Clean Your Track.
- Do not use common solvents, they may damage plastics - use track cleaner.
- After 24 hours of use, light lubrication is required to keep train in top operating condition. Bachmann E-Z Lube or other hobby-grade lubricants are recommended.
Bachmann hopes you enjoy your train for many years to come!

Bachmann Trains - Overland Limited Ready To Run Electric Train Set - HO Scale
Bachmann Trains
Product description
Overland Limited Ready To Run Electric Train Set - HO Scale. The biggest and the best for serious railroad enthusiasts. From a powerful 4-8-4 steam locomotive, to an impressive consist of nine cars, this set has it all! The Overland Limited comes complete with Bachmann‘s exclusive E-Z Track snap-fit track and roadbed system. This Ready To Run Electric Train Set Includes: Union Pacific 4-8-4 steam locomotive and tender with operating smoke and headlight, grain car, three-dome tank car, flat car with logs, center-flow hopper, open quad offset hopper, two plug-door box cars, wood stock car, wide-vision caboose, body-mounted E-Z Mate couplers, 63" x 54" oval of snap-fit E-Z Track with 16 pieces of 22" radius curved track, 5 pieces of straight track, and 1 plug-in terminal rerailer, power pack and speed controller, illustrated instruction manual.
From the Manufacturer
The biggest and the best for serious railroad enthusiasts. From a powerful 4-8-4 steam locomotive, to an impressive consist of nine cars, this set has it all! The Overland Limited comes complete with Bachmann’s exclusive E-Z Track snap-fit track and roadbed system.
- Complete Ready To Run Freight Train Set
- Powered by a Union Pacific 4-8-4 Steam Era Locomotive and Tender with Operating Smoke and Headlight
- Includes; Grain Car, Three-Dome Tank Car, Flat Car with Logs, Center-Flow Hopper Car, Open Quad Hopper Car, Two Plug Door Box Cars, Wood Stock Car, and Wide-Vision Caboose
- 63" x 45" Oval of Snap-Fit E-Z Track, Power Pack and Speed Controller
- HO Scale 1:87
- Union Pacific 4-8-4 steam locomotive and tender with operating smoke and headlight
- 8 Freight cars and wide-vision caboose
User questions & answers
| Question: | Hi i have a question, i have one of these 806 models that smokes just like this one, how much smoke oil do i put in?" i dont want to overfill it |
| Answer: | The scale doesn't seem to be listed, and I haven't seen the item in person but sent it to my 9-year-old nephew. I received a picture of him holding it, and I was pleasantly surprised at how large it is. I thought it might be very small, but it was a good size. Hope this helps! |
| Question: | Is this loco the smaller version of the big boy? can this pull half the cars the big boy can pull |
| Answer: | No. There is no base. Just the airplane is all that is in the box. |
| Question: | does it come with smoke |
| Answer: | If the 7 year old is used to building Legos it would take as long as the same size small Lego set. |
| Question: | Is this remote controlled? What would I need to mount it around a wall? Thanks |
| Answer: | Took my 11yo granddaughter less than an hour to build |
Product features
Discover Everything Bachmann Trains Offers to Get Started in Model Railroading
Since 1833, Bachmann has been known for providing innovative design at a good value. We are now one of the world's largest distributor, by volume, of ready-to-run train sets, locomotives, track, and accessories. Bachmann is also the only train company to offer products in all five of the most popular scales: N, HO, On30, O, and Large Scale.
As a distributor of beloved Thomas & Friends products, Bachmann brings the adventures of Thomas the Tank Engine to life with a growing line of complete train sets, separate sale items, and accessories for children from 8 to 80-just add your imagination. Thomas & Friends is available in both HO and Large Scale.
Bachmann's exclusive snap-together E-Z Track System makes track setup quick, easy, and fun. Plasticville U.S.A. and SceneScapes buildings and accessories let you add the finishing touches for the perfect layout.
If You Are Purchasing a Train Set, It Will Include
- Locomotive
- Cars (Rolling Stock)
- E-Z Track – available in either black roadbed with steel alloy rail or gray roadbed with nickel silver rail
- Terminal/Rerailer
- Terminal Wire
- Speed Controller
- Power Supply
- List of Components
Track Assembly
- Decide where to set up your train – a dry, firm, flat surface works best!
- To make sure you have enough working room, make a test track layout by loosely placing track in desired configuration.
- The terminal/rerailer section will later be connected to a power pack and power supply, so place it near an outlet or power strip.
- Install under-track magnet, if your set comes with one. If your set does not come with one, magnets are available separately (HO Item No. 78999; N Scale Item No. 78998).
- Assemble the track by pushing together. Make sure the rail and joiners are seated properly. Be careful that the rail joiners do not slip under the rail without properly connecting. This can cause train derailments and electrical circuit interruptions.
- After track is assembled, double-check for joint connection and fit by lightly running your fingers over the top of the rails in both directions.
- If you detect bumps or distortion on the track surface, recheck the rail joiner fit.
Power Connections
- Power supply and speed control are plug and play; no tools are needed.
- Power is supplied to the track and the locomotive by the power supply, speed controller, terminal wire, and E-Z Track terminal/rerailer.
- First – turn knob on the speed controller counterclockwise until it stops (all the way to the left).
- Next – attach terminal wire to the speed controller by plugging it in where it says 'To Track.'
- Then – plug terminal wire into the E-Z Track terminal rerailer. Firmly push connector onto the track terminals.
- Finally – plug the connecting wire from the power supply into jack on the speed controller labeled 'In.' Then plug power supply into a live wall outlet.
- Some sets may come with a speed controller with two push button connectors. These are used to supply AC power to accessories.
- To make positive and secure connections to these, push in buttons and insert each of the bare ends of the connection wire from your accessory.
- The speed controller is capable of powering one accessory at a time.
Putting the Train on the Track
- Put the locomotive on the track and run the wheels back and forth over the terminal rerailer track.
- When the wheels glide smoothly over the track, you know the wheels are all on the track. If your set comes with a tender, attach it to the locomotive.
- Add the rest of the cars that come with your set by placing them on the track and running them back and forth over the terminal rerailer until they glide smoothly. Then gently push the cars together – they will engage automatically.
- Do not try to connect cars when positioned over an under-track magnet.
How to Use E-Z Mate Couplers (HO and On30 Scale)
- Your set may be equipped with E-Z Mate magnetically operated knuckle couplers that let you perform real railroad switching and yard operations.
- Coupling two cars with E-Z Mate couplers is as easy as pushing them together when they are not over an under-track magnet.
- Uncoupling occurs only when over an under-track magnet and when there is no tension between the cars.
- To uncouple E-Z Mate couplers, stop two couplers directly over the under-track magnet. With no tension between the cars, the couplers will open automatically.
- If cars will not couple, check to be sure cars are not positioned over the uncoupling magnet or parked on a curve.
- If cars will not uncouple, check to be sure the couplers are positioned directly adjacent to the magnet position indicator and that the indicator is placed in line with the center line of the under-track magnet.
- Check that the magnet is secured to the underside of the track and fitted with the steel plate provided.
How to Run Your Train
- Turn the knob on the speed controller clockwise until it stops (all the way to the left).
- Plug in the power supply.
- Begin feeding power to the track by slowly turning the knob on the speed controller clockwise.
- Observe the direction of your train.
- If it moves backwards when the controls indicate forward, stop the train.
- Then simply disconnect, flip, and reconnect the terminal wire to the terminal rerailer track.
- Remember – never leave your train running unattended!
Action Checklist (Troubleshooting If Your Train Doesn’t Run or Stops Running)
- Is the power supply plugged in to a live receptacle?
- Are the wheels on the track?
- Is the wiring secure?
- Is the track properly assembled?
- Is the track properly seated in the rail joiner?
- If your train stops or fails to start, a short circuit may be indicated. If this is the case, Unplug The Power Supply Immediately.
- Common reasons for a short circuit: derailed wheels may cause a short. Check to make sure all wheels are on the track. Also check all connections and make sure there is no metal of any sort across the rails.
- After checking everything carefully, resume operation.
- Please note, your power supply is protected by a circuit breaker that automatically resets after a short circuit is corrected.
- Allow up to 5 minutes for the circuit breaker to reset before resuming operation.
Keep Your Train in Top Operating Condition
- Works better after couple hours of break-in time.
- Train performs best under clean operating conditions.
- Clean wheels and a clean track ensure good electrical contact.
- After about every 8 hours of operation, wipe the track rails and exposed wheels with a soft, lint-free cloth.
- Removal of black residue is normal.
- Do Not Use Steel Wool To Clean Your Track.
- Do not use common solvents, they may damage plastics - use track cleaner.
- After 24 hours of use, light lubrication is required to keep train in top operating condition. Bachmann E-Z Lube or other hobby-grade lubricants are recommended.
Bachmann hopes you enjoy your train for many years to come!

Bachmann Trains - Thunder Chief DCC Sound Value Ready To Run Electric Train Set - HO Scale
Bachmann Trains
Product description
Bachmann Trains THUNDER CHIEF - HO Scale Ready to Run Electric Train Set With Sound Value Equipped Locomotive - HO Scale. With the roar of its mighty motor and a blast of its horn, the Thunder Chief announces its arrival. Commanding the attention of one and all, there is no missing the excitement of the Thunder Chief storming into the station. Featuring a DCC sound-equipped F7-A with a diesel sound package that includes prototypical prime mover, three air horns, and bell-all in polyphonic 16-bit sound that you can control with our E-Z Command digital control system. This digitally controlled train set with sound features: DCC sound-equipped F7-A diesel locomotive, 40' box car, three-dome tank car, off-center caboose, E-Z Command Control Center with wall pack and plug-in wiring, body-mounted E-Z Mate couplers, 56" x 38" oval of snap-fit nickel silver E-Z Track including 12 pieces of curved track, 3 pieces of straight track, and 1 plug-in, terminal rerailer, illustrated instruction manual.
- Complete Ready To Run Train Set with DCC Sound Locomotive
- Powered by a DCC Sound-Equipped F7-A Diesel Locomotive with Operating Headlight
- Includes; Box Car, Three-Dome Tank Car, and Off-Set Cupola Caboose
- 56" x 38" Oval of Nickel Silver E-Z Track, Power Pack and E-Z Command Controller
- HO Scale 1:87
- DCC-Equipped for Speed, Direction Lighting, and Sound
User questions & answers
| Question: | what is the Radius of 12 pieces of curved track ? Appreciated can provide details of all track specification,Tx |
| Answer: | It's dcc set it has one controller for both trains and you can add trains and use the same controller As long as it's dcc and Beckman |
| Question: | The train does not stop when the speed dial is at zero, Anyone else have this issue, or how to resolve it |
| Answer: | Yes they are interchangeable.. This is a wonderful set .. We use it for our train store as well as our train club.. |
| Question: | I have a lot of dc ho cars and track, not dcc. Can I combine and intermingle these or is it like beta and vhs |
| Answer: | Yes you can! If you have the power loc track, the easiest way is to just buy the life-like track adapter and hook in the terminal re-railer section, The ez command pugs right in to re-railer. If you have the room, you could also use the track adapter to attach some or all of the track up to your existing layout. If you have the old style Ho track, you can use the included adapter, at least i think one comes with the set, to connect up the ez command station to your old layout. don't forget to disconnect your old power pack(s) from the track first! Hope this helps! |
| Question: | No sounds after 4 months, light works intermittently, any ideas? How do I troubleshoot |
| Answer: | Yes you can. You can use all the track, one controller and assign all locos to that controller to run them. |
Product features
Discover Everything Bachmann Trains Offers to Get Started in Model Railroading
Since 1833, Bachmann has been known for providing innovative design at a good value. We are now one of the world's largest distributor, by volume, of ready-to-run train sets, locomotives, track, and accessories. Bachmann is also the only train company to offer products in all five of the most popular scales: N, HO, On30, O, and Large Scale.
As a distributor of beloved Thomas & Friends products, Bachmann brings the adventures of Thomas the Tank Engine to life with a growing line of complete train sets, separate sale items, and accessories for children from 8 to 80-just add your imagination. Thomas & Friends is available in both HO and Large Scale.
Bachmann's exclusive snap-together E-Z Track System makes track setup quick, easy, and fun. Plasticville U.S.A. and SceneScapes buildings and accessories let you add the finishing touches for the perfect layout.
If You Are Purchasing a Train Set, It Will Include
- Locomotive
- Cars (Rolling Stock)
- E-Z Track – available in either black roadbed with steel alloy rail or gray roadbed with nickel silver rail
- Terminal/Rerailer
- Terminal Wire
- Speed Controller
- Power Supply
- List of Components
Track Assembly
- Decide where to set up your train – a dry, firm, flat surface works best!
- To make sure you have enough working room, make a test track layout by loosely placing track in desired configuration.
- The terminal/rerailer section will later be connected to a power pack and power supply, so place it near an outlet or power strip.
- Install under-track magnet, if your set comes with one. If your set does not come with one, magnets are available separately (HO Item No. 78999; N Scale Item No. 78998).
- Assemble the track by pushing together. Make sure the rail and joiners are seated properly. Be careful that the rail joiners do not slip under the rail without properly connecting. This can cause train derailments and electrical circuit interruptions.
- After track is assembled, double-check for joint connection and fit by lightly running your fingers over the top of the rails in both directions.
- If you detect bumps or distortion on the track surface, recheck the rail joiner fit.
Power Connections
- Power supply and speed control are plug and play; no tools are needed.
- Power is supplied to the track and the locomotive by the power supply, speed controller, terminal wire, and E-Z Track terminal/rerailer.
- First – turn knob on the speed controller counterclockwise until it stops (all the way to the left).
- Next – attach terminal wire to the speed controller by plugging it in where it says 'To Track.'
- Then – plug terminal wire into the E-Z Track terminal rerailer. Firmly push connector onto the track terminals.
- Finally – plug the connecting wire from the power supply into jack on the speed controller labeled 'In.' Then plug power supply into a live wall outlet.
- Some sets may come with a speed controller with two push button connectors. These are used to supply AC power to accessories.
- To make positive and secure connections to these, push in buttons and insert each of the bare ends of the connection wire from your accessory.
- The speed controller is capable of powering one accessory at a time.
Putting the Train on the Track
- Put the locomotive on the track and run the wheels back and forth over the terminal rerailer track.
- When the wheels glide smoothly over the track, you know the wheels are all on the track. If your set comes with a tender, attach it to the locomotive.
- Add the rest of the cars that come with your set by placing them on the track and running them back and forth over the terminal rerailer until they glide smoothly. Then gently push the cars together – they will engage automatically.
- Do not try to connect cars when positioned over an under-track magnet.
How to Use E-Z Mate Couplers (HO and On30 Scale)
- Your set may be equipped with E-Z Mate magnetically operated knuckle couplers that let you perform real railroad switching and yard operations.
- Coupling two cars with E-Z Mate couplers is as easy as pushing them together when they are not over an under-track magnet.
- Uncoupling occurs only when over an under-track magnet and when there is no tension between the cars.
- To uncouple E-Z Mate couplers, stop two couplers directly over the under-track magnet. With no tension between the cars, the couplers will open automatically.
- If cars will not couple, check to be sure cars are not positioned over the uncoupling magnet or parked on a curve.
- If cars will not uncouple, check to be sure the couplers are positioned directly adjacent to the magnet position indicator and that the indicator is placed in line with the center line of the under-track magnet.
- Check that the magnet is secured to the underside of the track and fitted with the steel plate provided.
How to Run Your Train
- Turn the knob on the speed controller clockwise until it stops (all the way to the left).
- Plug in the power supply.
- Begin feeding power to the track by slowly turning the knob on the speed controller clockwise.
- Observe the direction of your train.
- If it moves backwards when the controls indicate forward, stop the train.
- Then simply disconnect, flip, and reconnect the terminal wire to the terminal rerailer track.
- Remember – never leave your train running unattended!
Action Checklist (Troubleshooting If Your Train Doesn’t Run or Stops Running)
- Is the power supply plugged in to a live receptacle?
- Are the wheels on the track?
- Is the wiring secure?
- Is the track properly assembled?
- Is the track properly seated in the rail joiner?
- If your train stops or fails to start, a short circuit may be indicated. If this is the case, Unplug The Power Supply Immediately.
- Common reasons for a short circuit: derailed wheels may cause a short. Check to make sure all wheels are on the track. Also check all connections and make sure there is no metal of any sort across the rails.
- After checking everything carefully, resume operation.
- Please note, your power supply is protected by a circuit breaker that automatically resets after a short circuit is corrected.
- Allow up to 5 minutes for the circuit breaker to reset before resuming operation.
Keep Your Train in Top Operating Condition
- Works better after couple hours of break-in time.
- Train performs best under clean operating conditions.
- Clean wheels and a clean track ensure good electrical contact.
- After about every 8 hours of operation, wipe the track rails and exposed wheels with a soft, lint-free cloth.
- Removal of black residue is normal.
- Do Not Use Steel Wool To Clean Your Track.
- Do not use common solvents, they may damage plastics - use track cleaner.
- After 24 hours of use, light lubrication is required to keep train in top operating condition. Bachmann E-Z Lube or other hobby-grade lubricants are recommended.
Bachmann hopes you enjoy your train for many years to come!

Bachmann Trains - Pacific Flyer Ready To Run Electric Train Set - HO Scale
Bachmann Trains
Product description
Pacific Flyer Ready To Run Electric Train Set - HO Scale. Assembly and breakdown of trains in the railway yard is tough work, but this 0-6-0 steam switcher is ready to get the job done. Assemble your consist, clear the yard and move your freight to its final destination with the Pacific Flyer! Watch the video to see the set in action! This ready-to-run train set includes: 0-6-0 steam locomotive and tender with operating headlight, gondola, box car, offset cupola caboose, body-mounted E-Z Mate couplers, 36" circle of snap-fit E-Z Track including 11 pieces of curved track and 1 curved plug-in terminal rerailer, power pack and speed control, illustrated instruction manual
From the Manufacturer
Assembly and breakdown of trains in the railway yard is tough work, but this 0-6-0 steam switcher is ready to get the job done. Assemble your consist, clear the yard and move your freight to its final destination with the Pacific Flyer.
- Complete Ready To Run Freight Train Set
- Powered by a 0-6-0 Steam Era Locomotive and Tender with Operating Headlight
- Includes; Gondola Car, Box Car, and Off-Set Cupola Caboose
- 36" Circle of Snap-Fit E-Z Track, Power Pack and Speed Controller
- HO Scale 1:87
User questions & answers
| Question: | Is the Height 3 inches |
| Answer: | Hi there, The Adventure Town Railway train set is compatible with KidKraft, Brio® and Thomas & Friends Wooden Railway vehicles and play sets. Thank you for playing with KIdKraft!- The KidKraft Customer Care Team |
| Question: | does it have smoke |
| Answer: | If you contact the seller they might be able to assist you with any broken parts or pieces missing, that's generally what I do. |
| Question: | why does my train slow down when it gets to a certain point on the track |
| Answer: | Hi There, The bins on the Adventure Railway Train Set & Table do slide under on wooden rails designed to hold them. Thank you for Playing with KidKraft! The Kidkraft Customer Care Team |
| Question: | Does the train whistle |
| Answer: | I don't know for sure, but I think duplo are the same size and pattern as lego blocks. I bought the table for my grand-niece so I haven't actually seen it yet. Your answer might be to compare the specifications for legos and duplos at their manufacturers' sites. Sorry I can't be of more assistance, I had American Bricks and Lincoln Logs when I was a kid! |
Product features
Discover Everything Bachmann Trains Offers to Get Started in Model Railroading
Since 1833, Bachmann has been known for providing innovative design at a good value. We are now one of the world's largest distributor, by volume, of ready-to-run train sets, locomotives, track, and accessories. Bachmann is also the only train company to offer products in all five of the most popular scales: N, HO, On30, O, and Large Scale.
As a distributor of beloved Thomas & Friends products, Bachmann brings the adventures of Thomas the Tank Engine to life with a growing line of complete train sets, separate sale items, and accessories for children from 8 to 80-just add your imagination. Thomas & Friends is available in both HO and Large Scale.
Bachmann's exclusive snap-together E-Z Track System makes track setup quick, easy, and fun. Plasticville U.S.A. and SceneScapes buildings and accessories let you add the finishing touches for the perfect layout.
If You Are Purchasing a Train Set, It Will Include
- Locomotive
- Cars (Rolling Stock)
- E-Z Track – available in either black roadbed with steel alloy rail or gray roadbed with nickel silver rail
- Terminal/Rerailer
- Terminal Wire
- Speed Controller
- Power Supply
- List of Components
Track Assembly
- Decide where to set up your train – a dry, firm, flat surface works best!
- To make sure you have enough working room, make a test track layout by loosely placing track in desired configuration.
- The terminal/rerailer section will later be connected to a power pack and power supply, so place it near an outlet or power strip.
- Install under-track magnet, if your set comes with one. If your set does not come with one, magnets are available separately (HO Item No. 78999; N Scale Item No. 78998).
- Assemble the track by pushing together. Make sure the rail and joiners are seated properly. Be careful that the rail joiners do not slip under the rail without properly connecting. This can cause train derailments and electrical circuit interruptions.
- After track is assembled, double-check for joint connection and fit by lightly running your fingers over the top of the rails in both directions.
- If you detect bumps or distortion on the track surface, recheck the rail joiner fit.
Power Connections
- Power supply and speed control are plug and play; no tools are needed.
- Power is supplied to the track and the locomotive by the power supply, speed controller, terminal wire, and E-Z Track terminal/rerailer.
- First – turn knob on the speed controller counterclockwise until it stops (all the way to the left).
- Next – attach terminal wire to the speed controller by plugging it in where it says 'To Track.'
- Then – plug terminal wire into the E-Z Track terminal rerailer. Firmly push connector onto the track terminals.
- Finally – plug the connecting wire from the power supply into jack on the speed controller labeled 'In.' Then plug power supply into a live wall outlet.
- Some sets may come with a speed controller with two push button connectors. These are used to supply AC power to accessories.
- To make positive and secure connections to these, push in buttons and insert each of the bare ends of the connection wire from your accessory.
- The speed controller is capable of powering one accessory at a time.
Putting the Train on the Track
- Put the locomotive on the track and run the wheels back and forth over the terminal rerailer track.
- When the wheels glide smoothly over the track, you know the wheels are all on the track. If your set comes with a tender, attach it to the locomotive.
- Add the rest of the cars that come with your set by placing them on the track and running them back and forth over the terminal rerailer until they glide smoothly. Then gently push the cars together – they will engage automatically.
- Do not try to connect cars when positioned over an under-track magnet.
How to Use E-Z Mate Couplers (HO and On30 Scale)
- Your set may be equipped with E-Z Mate magnetically operated knuckle couplers that let you perform real railroad switching and yard operations.
- Coupling two cars with E-Z Mate couplers is as easy as pushing them together when they are not over an under-track magnet.
- Uncoupling occurs only when over an under-track magnet and when there is no tension between the cars.
- To uncouple E-Z Mate couplers, stop two couplers directly over the under-track magnet. With no tension between the cars, the couplers will open automatically.
- If cars will not couple, check to be sure cars are not positioned over the uncoupling magnet or parked on a curve.
- If cars will not uncouple, check to be sure the couplers are positioned directly adjacent to the magnet position indicator and that the indicator is placed in line with the center line of the under-track magnet.
- Check that the magnet is secured to the underside of the track and fitted with the steel plate provided.
How to Run Your Train
- Turn the knob on the speed controller clockwise until it stops (all the way to the left).
- Plug in the power supply.
- Begin feeding power to the track by slowly turning the knob on the speed controller clockwise.
- Observe the direction of your train.
- If it moves backwards when the controls indicate forward, stop the train.
- Then simply disconnect, flip, and reconnect the terminal wire to the terminal rerailer track.
- Remember – never leave your train running unattended!
Action Checklist (Troubleshooting If Your Train Doesn’t Run or Stops Running)
- Is the power supply plugged in to a live receptacle?
- Are the wheels on the track?
- Is the wiring secure?
- Is the track properly assembled?
- Is the track properly seated in the rail joiner?
- If your train stops or fails to start, a short circuit may be indicated. If this is the case, Unplug The Power Supply Immediately.
- Common reasons for a short circuit: derailed wheels may cause a short. Check to make sure all wheels are on the track. Also check all connections and make sure there is no metal of any sort across the rails.
- After checking everything carefully, resume operation.
- Please note, your power supply is protected by a circuit breaker that automatically resets after a short circuit is corrected.
- Allow up to 5 minutes for the circuit breaker to reset before resuming operation.
Keep Your Train in Top Operating Condition
- Works better after couple hours of break-in time.
- Train performs best under clean operating conditions.
- Clean wheels and a clean track ensure good electrical contact.
- After about every 8 hours of operation, wipe the track rails and exposed wheels with a soft, lint-free cloth.
- Removal of black residue is normal.
- Do Not Use Steel Wool To Clean Your Track.
- Do not use common solvents, they may damage plastics - use track cleaner.
- After 24 hours of use, light lubrication is required to keep train in top operating condition. Bachmann E-Z Lube or other hobby-grade lubricants are recommended.
Bachmann hopes you enjoy your train for many years to come!

Bachmann Trains - Santa Fe Flyer Ready To Run Electric Train Set - HO Scale
Bachmann Trains
Product description
Santa Fe Flyer Ready To Run Electric Train Set - HO Scale. Hauling freight across the deserts, mountains, and cities of the American landscape is the Santa Fe Flyer. Powered by a mighty Santa Fe FT diesel locomotive with its distinctive “war bonnet” paint scheme, this sleek and powerful train deftly handles the ever-changing terrain of the Southwest United States. The Santa Fe Flyer includes: EMD FT diesel locomotive with operating headlight, open quad hopper, gondola, offset cupola caboose, body-mounted E-Z Mate couplers, 36" circle of snap-fit E-Z Track including 11 pieces of curved track and 1 curved plug-in terminal rerailer, power pack and speed controller, illustrated instruction manual.
From the Manufacturer
Hauling freight across the deserts, mountains, and cities of the American landscape is the Santa Fe Flyer. Powered by a mighty Santa Fe FT diesel locomotive with its distinctive war bonnet paint scheme, this sleek and powerful train deftly handles the ever-changing terrain of the Southwest United States.
- Complete Ready To Run Freight Train Set
- Powered by a EMD FT Diesel Locomotive with Operating Headlight
- Includes; Open Quad Hopper Car, Gondola Car, and Off-Set Cupola Caboose
- 36" Circle of Snap-Fit E-Z Track, Power Pack and Speed Controller
- HO Scale 1:87
User questions & answers
| Question: | which is the width of the tracks? thx |
| Answer: | From tie to tieEnd is about two inches and from track to track it is 3/4 of an inch hope that helps you |
| Question: | Is this locomotive reasonably quiet |
| Answer: | Kids playing with the train make a lot of noise but the train is quiet. |
| Question: | does this train run on elect or is it batt opreated and what all comes with it |
| Answer: | Electric with a 12 volt DC supply. I would not buy a battery operated train. |
| Question: | can the track for this train be added to make it larger and if so how much more |
| Answer: | The track in this set is HO scale which is very popular. You can add as much track as you like to make many different layouts. Just look on Youtube for HO scale and see some very large realistic train layouts. You can buy HO track on line ot at many hobby shops. Prices vary. |
Product features
Discover Everything Bachmann Trains Offers to Get Started in Model Railroading
Since 1833, Bachmann has been known for providing innovative design at a good value. We are now one of the world's largest distributor, by volume, of ready-to-run train sets, locomotives, track, and accessories. Bachmann is also the only train company to offer products in all five of the most popular scales: N, HO, On30, O, and Large Scale.
As a distributor of beloved Thomas & Friends products, Bachmann brings the adventures of Thomas the Tank Engine to life with a growing line of complete train sets, separate sale items, and accessories for children from 8 to 80-just add your imagination. Thomas & Friends is available in both HO and Large Scale.
Bachmann's exclusive snap-together E-Z Track System makes track setup quick, easy, and fun. Plasticville U.S.A. and SceneScapes buildings and accessories let you add the finishing touches for the perfect layout.
If You Are Purchasing a Train Set, It Will Include
- Locomotive
- Cars (Rolling Stock)
- E-Z Track – available in either black roadbed with steel alloy rail or gray roadbed with nickel silver rail
- Terminal/Rerailer
- Terminal Wire
- Speed Controller
- Power Supply
- List of Components
Track Assembly
- Decide where to set up your train – a dry, firm, flat surface works best!
- To make sure you have enough working room, make a test track layout by loosely placing track in desired configuration.
- The terminal/rerailer section will later be connected to a power pack and power supply, so place it near an outlet or power strip.
- Install under-track magnet, if your set comes with one. If your set does not come with one, magnets are available separately (HO Item No. 78999; N Scale Item No. 78998).
- Assemble the track by pushing together. Make sure the rail and joiners are seated properly. Be careful that the rail joiners do not slip under the rail without properly connecting. This can cause train derailments and electrical circuit interruptions.
- After track is assembled, double-check for joint connection and fit by lightly running your fingers over the top of the rails in both directions.
- If you detect bumps or distortion on the track surface, recheck the rail joiner fit.
Power Connections
- Power supply and speed control are plug and play; no tools are needed.
- Power is supplied to the track and the locomotive by the power supply, speed controller, terminal wire, and E-Z Track terminal/rerailer.
- First – turn knob on the speed controller counterclockwise until it stops (all the way to the left).
- Next – attach terminal wire to the speed controller by plugging it in where it says 'To Track.'
- Then – plug terminal wire into the E-Z Track terminal rerailer. Firmly push connector onto the track terminals.
- Finally – plug the connecting wire from the power supply into jack on the speed controller labeled 'In.' Then plug power supply into a live wall outlet.
- Some sets may come with a speed controller with two push button connectors. These are used to supply AC power to accessories.
- To make positive and secure connections to these, push in buttons and insert each of the bare ends of the connection wire from your accessory.
- The speed controller is capable of powering one accessory at a time.
Putting the Train on the Track
- Put the locomotive on the track and run the wheels back and forth over the terminal rerailer track.
- When the wheels glide smoothly over the track, you know the wheels are all on the track. If your set comes with a tender, attach it to the locomotive.
- Add the rest of the cars that come with your set by placing them on the track and running them back and forth over the terminal rerailer until they glide smoothly. Then gently push the cars together – they will engage automatically.
- Do not try to connect cars when positioned over an under-track magnet.
How to Use E-Z Mate Couplers (HO and On30 Scale)
- Your set may be equipped with E-Z Mate magnetically operated knuckle couplers that let you perform real railroad switching and yard operations.
- Coupling two cars with E-Z Mate couplers is as easy as pushing them together when they are not over an under-track magnet.
- Uncoupling occurs only when over an under-track magnet and when there is no tension between the cars.
- To uncouple E-Z Mate couplers, stop two couplers directly over the under-track magnet. With no tension between the cars, the couplers will open automatically.
- If cars will not couple, check to be sure cars are not positioned over the uncoupling magnet or parked on a curve.
- If cars will not uncouple, check to be sure the couplers are positioned directly adjacent to the magnet position indicator and that the indicator is placed in line with the center line of the under-track magnet.
- Check that the magnet is secured to the underside of the track and fitted with the steel plate provided.
How to Run Your Train
- Turn the knob on the speed controller clockwise until it stops (all the way to the left).
- Plug in the power supply.
- Begin feeding power to the track by slowly turning the knob on the speed controller clockwise.
- Observe the direction of your train.
- If it moves backwards when the controls indicate forward, stop the train.
- Then simply disconnect, flip, and reconnect the terminal wire to the terminal rerailer track.
- Remember – never leave your train running unattended!
Action Checklist (Troubleshooting If Your Train Doesn’t Run or Stops Running)
- Is the power supply plugged in to a live receptacle?
- Are the wheels on the track?
- Is the wiring secure?
- Is the track properly assembled?
- Is the track properly seated in the rail joiner?
- If your train stops or fails to start, a short circuit may be indicated. If this is the case, Unplug The Power Supply Immediately.
- Common reasons for a short circuit: derailed wheels may cause a short. Check to make sure all wheels are on the track. Also check all connections and make sure there is no metal of any sort across the rails.
- After checking everything carefully, resume operation.
- Please note, your power supply is protected by a circuit breaker that automatically resets after a short circuit is corrected.
- Allow up to 5 minutes for the circuit breaker to reset before resuming operation.
Keep Your Train in Top Operating Condition
- Works better after couple hours of break-in time.
- Train performs best under clean operating conditions.
- Clean wheels and a clean track ensure good electrical contact.
- After about every 8 hours of operation, wipe the track rails and exposed wheels with a soft, lint-free cloth.
- Removal of black residue is normal.
- Do Not Use Steel Wool To Clean Your Track.
- Do not use common solvents, they may damage plastics - use track cleaner.
- After 24 hours of use, light lubrication is required to keep train in top operating condition. Bachmann E-Z Lube or other hobby-grade lubricants are recommended.
Bachmann hopes you enjoy your train for many years to come!

Bachmann Trains - Rail Chief Ready To Run 130 Piece Electric Train Set - HO Scale
Bachmann Trains
Product description
5-Car "HO scale" Train - EMD GP40 diesel locomotive (with operating headlight) - open quad hopper- gondola- steel Reefer- off-center caboose body-mounted E-Z Mate couplers 47" X 38” oval track sets up in minutes includes signal bridge, 36 people figures, 24 telephone poles and 48 railroad and street signs includes Power pack, speed controller and plug-in terminal rerailer plugs into an AC outlet ages 14+
From the Manufacturer
You will command the rails with our striking Rail Chief set. Complete with miniature people and a signal bridge, this 130-piece set will let you oversee your own detailed railroading empire. This ready-to-run train set includes: EMD GP40 diesel locomotive with operating headlight, open quad hopper car, gondola car, steel reefer car, off-center caboose, 47" x 38" oval of snap-fit E-Z Track, including 12 pieces curved track, 1 piece straight track, and 1 plug-in terminal rerailer, signal bridge, 36 miniature people, 24 telephone poles, 48 railroad and street signs, power pack and speed controller.
- Complete Ready To Run 130 Piece Freight Train Set
- Powered by a EMD GP40 Diesel Locomotive with Operating Headlight
- Includes; Open Quad Hopper Car, Gondola Car, Steel Reefer Car, Off-Set Cupola Caboose, Signal Bridge, Miniature Figures, Railroad Signs, Street Signs, and Telephone Poles
- 47" x 38" Oval of Snap-Fit E-Z Track, Power Pack and Speed Controller
- HO Scale 1:87
User questions & answers
| Question: | Is the transformer battery powered or plug-in |
| Answer: | That I do not know, but I would think so. |
| Question: | What are the measurements of the train cars |
| Answer: | yes |
| Question: | The age on this is 14 I'm looking for a train set for my 6 year old grandson. Is this really to advanced |
| Answer: | Yes, you can buy curved sections, straight sections, and left and right switches. I bought this set for my granddaughter (and I ) I think I paid $89 for the set and then on eBay bought about $75 of track. We made a really nice big layout with sidings and two loops. I’m very impressed with this set. I may be a little over the top, but I also found a couple of extra rail cars from the John Deere set on eBay to add to her Pennsylvania Flyer. |
| Question: | Is the engine plastic or metal |
| Answer: | There are switches |
Product features
Discover Everything Bachmann Trains Offers to Get Started in Model Railroading
Since 1833, Bachmann has been known for providing innovative design at a good value. We are now one of the world's largest distributor, by volume, of ready-to-run train sets, locomotives, track, and accessories. Bachmann is also the only train company to offer products in all five of the most popular scales: N, HO, On30, O, and Large Scale.
As a distributor of beloved Thomas & Friends products, Bachmann brings the adventures of Thomas the Tank Engine to life with a growing line of complete train sets, separate sale items, and accessories for children from 8 to 80-just add your imagination. Thomas & Friends is available in both HO and Large Scale.
Bachmann's exclusive snap-together E-Z Track System makes track setup quick, easy, and fun. Plasticville U.S.A. and SceneScapes buildings and accessories let you add the finishing touches for the perfect layout.
If You Are Purchasing a Train Set, It Will Include
- Locomotive
- Cars (Rolling Stock)
- E-Z Track – available in either black roadbed with steel alloy rail or gray roadbed with nickel silver rail
- Terminal/Rerailer
- Terminal Wire
- Speed Controller
- Power Supply
- List of Components
Track Assembly
- Decide where to set up your train – a dry, firm, flat surface works best!
- To make sure you have enough working room, make a test track layout by loosely placing track in desired configuration.
- The terminal/rerailer section will later be connected to a power pack and power supply, so place it near an outlet or power strip.
- Install under-track magnet, if your set comes with one. If your set does not come with one, magnets are available separately (HO Item No. 78999; N Scale Item No. 78998).
- Assemble the track by pushing together. Make sure the rail and joiners are seated properly. Be careful that the rail joiners do not slip under the rail without properly connecting. This can cause train derailments and electrical circuit interruptions.
- After track is assembled, double-check for joint connection and fit by lightly running your fingers over the top of the rails in both directions.
- If you detect bumps or distortion on the track surface, recheck the rail joiner fit.
Power Connections
- Power supply and speed control are plug and play; no tools are needed.
- Power is supplied to the track and the locomotive by the power supply, speed controller, terminal wire, and E-Z Track terminal/rerailer.
- First – turn knob on the speed controller counterclockwise until it stops (all the way to the left).
- Next – attach terminal wire to the speed controller by plugging it in where it says 'To Track.'
- Then – plug terminal wire into the E-Z Track terminal rerailer. Firmly push connector onto the track terminals.
- Finally – plug the connecting wire from the power supply into jack on the speed controller labeled 'In.' Then plug power supply into a live wall outlet.
- Some sets may come with a speed controller with two push button connectors. These are used to supply AC power to accessories.
- To make positive and secure connections to these, push in buttons and insert each of the bare ends of the connection wire from your accessory.
- The speed controller is capable of powering one accessory at a time.
Putting the Train on the Track
- Put the locomotive on the track and run the wheels back and forth over the terminal rerailer track.
- When the wheels glide smoothly over the track, you know the wheels are all on the track. If your set comes with a tender, attach it to the locomotive.
- Add the rest of the cars that come with your set by placing them on the track and running them back and forth over the terminal rerailer until they glide smoothly. Then gently push the cars together – they will engage automatically.
- Do not try to connect cars when positioned over an under-track magnet.
How to Use E-Z Mate Couplers (HO and On30 Scale)
- Your set may be equipped with E-Z Mate magnetically operated knuckle couplers that let you perform real railroad switching and yard operations.
- Coupling two cars with E-Z Mate couplers is as easy as pushing them together when they are not over an under-track magnet.
- Uncoupling occurs only when over an under-track magnet and when there is no tension between the cars.
- To uncouple E-Z Mate couplers, stop two couplers directly over the under-track magnet. With no tension between the cars, the couplers will open automatically.
- If cars will not couple, check to be sure cars are not positioned over the uncoupling magnet or parked on a curve.
- If cars will not uncouple, check to be sure the couplers are positioned directly adjacent to the magnet position indicator and that the indicator is placed in line with the center line of the under-track magnet.
- Check that the magnet is secured to the underside of the track and fitted with the steel plate provided.
How to Run Your Train
- Turn the knob on the speed controller clockwise until it stops (all the way to the left).
- Plug in the power supply.
- Begin feeding power to the track by slowly turning the knob on the speed controller clockwise.
- Observe the direction of your train.
- If it moves backwards when the controls indicate forward, stop the train.
- Then simply disconnect, flip, and reconnect the terminal wire to the terminal rerailer track.
- Remember – never leave your train running unattended!
Action Checklist (Troubleshooting If Your Train Doesn’t Run or Stops Running)
- Is the power supply plugged in to a live receptacle?
- Are the wheels on the track?
- Is the wiring secure?
- Is the track properly assembled?
- Is the track properly seated in the rail joiner?
- If your train stops or fails to start, a short circuit may be indicated. If this is the case, Unplug The Power Supply Immediately.
- Common reasons for a short circuit: derailed wheels may cause a short. Check to make sure all wheels are on the track. Also check all connections and make sure there is no metal of any sort across the rails.
- After checking everything carefully, resume operation.
- Please note, your power supply is protected by a circuit breaker that automatically resets after a short circuit is corrected.
- Allow up to 5 minutes for the circuit breaker to reset before resuming operation.
Keep Your Train in Top Operating Condition
- Works better after couple hours of break-in time.
- Train performs best under clean operating conditions.
- Clean wheels and a clean track ensure good electrical contact.
- After about every 8 hours of operation, wipe the track rails and exposed wheels with a soft, lint-free cloth.
- Removal of black residue is normal.
- Do Not Use Steel Wool To Clean Your Track.
- Do not use common solvents, they may damage plastics - use track cleaner.
- After 24 hours of use, light lubrication is required to keep train in top operating condition. Bachmann E-Z Lube or other hobby-grade lubricants are recommended.
Bachmann hopes you enjoy your train for many years to come!

Bachmann Trains - Jingle Bell Express Ready To Run Electric Train Set - HO Scale
Bachmann Trains
Product description
This Bachmann Trains Jingle Bell Express HO Scale Electric Train Toy will make a special addition to holiday decor. It is decked out in red and green and is carrying a sweet cargo of holiday treats. The ready-to-run electric train set for kids will delivery merry dreams around your Christmas tree for years to come. This item includes one 0-6-0 steam locomotive with an operating headlight and coal tender, a single-dome tank car, a box car, a quad hopper car and an off-center caboose. It also comes with a large E-Z track oval, a power pack and speed controller and an illustrated instruction manual. This Bachmann electric train set will delight both kids and adults.
- Complete Ready To Run Holiday Train Set
- Powered by a 0-6-0 Steam Era Locomotive and Tender with Operating Headlight
- Includes; Single Dome Tank Car, Box Car, Quad Hopper Car, and Off-Set Cupola Caboose
- 47" x 38" Oval of Snap-Fit E-Z Track, Power Pack and Speed Controller
- HO Scale 1:87
- Complete Ready to Run Electric Train Set
- Features a Holiday Decorated Locomotive
User questions & answers
| Question: | I just bought this but I have no idea what size/scale and where of christmas village should I buy. Does anyone have an idea |
| Answer: | The train set is HO scale. |
| Question: | Is it possible to set the train to start working as soon as it has power or do you need to press a button/turn it on each time to get it working |
| Answer: | Yes, that should be the default setting - you will be able to control the power via the transformer. |
| Question: | Delliver they also to Belgium |
| Answer: | Thanks for visiting our store! Unfortunately, we do not ship internationally at this time and apologize for any disappointment. |
| Question: | Train derailed often |
| Answer: | We struggled for years with the train derailing. This year I decided to do some research. I read that though the track looks perfectly connected the rails may not be perfectly lined up. I checked and three of our connections we're not flush on the top. After I fixed this, we put the train on and now it runs perfectly. So happy. |
Product features
Discover Everything Bachmann Trains Offers to Get Started in Model Railroading
Since 1833, Bachmann has been known for providing innovative design at a good value. We are now one of the world's largest distributor, by volume, of ready-to-run train sets, locomotives, track, and accessories. Bachmann is also the only train company to offer products in all five of the most popular scales: N, HO, On30, O, and Large Scale.
As a distributor of beloved Thomas & Friends products, Bachmann brings the adventures of Thomas the Tank Engine to life with a growing line of complete train sets, separate sale items, and accessories for children from 8 to 80-just add your imagination. Thomas & Friends is available in both HO and Large Scale.
Bachmann's exclusive snap-together E-Z Track System makes track setup quick, easy, and fun. Plasticville U.S.A. and SceneScapes buildings and accessories let you add the finishing touches for the perfect layout.
If You Are Purchasing a Train Set, It Will Include
- Locomotive
- Cars (Rolling Stock)
- E-Z Track – available in either black roadbed with steel alloy rail or gray roadbed with nickel silver rail
- Terminal/Rerailer
- Terminal Wire
- Speed Controller
- Power Supply
- List of Components
Track Assembly
- Decide where to set up your train – a dry, firm, flat surface works best!
- To make sure you have enough working room, make a test track layout by loosely placing track in desired configuration.
- The terminal/rerailer section will later be connected to a power pack and power supply, so place it near an outlet or power strip.
- Install under-track magnet, if your set comes with one. If your set does not come with one, magnets are available separately (HO Item No. 78999; N Scale Item No. 78998).
- Assemble the track by pushing together. Make sure the rail and joiners are seated properly. Be careful that the rail joiners do not slip under the rail without properly connecting. This can cause train derailments and electrical circuit interruptions.
- After track is assembled, double-check for joint connection and fit by lightly running your fingers over the top of the rails in both directions.
- If you detect bumps or distortion on the track surface, recheck the rail joiner fit.
Power Connections
- Power supply and speed control are plug and play; no tools are needed.
- Power is supplied to the track and the locomotive by the power supply, speed controller, terminal wire, and E-Z Track terminal/rerailer.
- First – turn knob on the speed controller counterclockwise until it stops (all the way to the left).
- Next – attach terminal wire to the speed controller by plugging it in where it says 'To Track.'
- Then – plug terminal wire into the E-Z Track terminal rerailer. Firmly push connector onto the track terminals.
- Finally – plug the connecting wire from the power supply into jack on the speed controller labeled 'In.' Then plug power supply into a live wall outlet.
- Some sets may come with a speed controller with two push button connectors. These are used to supply AC power to accessories.
- To make positive and secure connections to these, push in buttons and insert each of the bare ends of the connection wire from your accessory.
- The speed controller is capable of powering one accessory at a time.
Putting the Train on the Track
- Put the locomotive on the track and run the wheels back and forth over the terminal rerailer track.
- When the wheels glide smoothly over the track, you know the wheels are all on the track. If your set comes with a tender, attach it to the locomotive.
- Add the rest of the cars that come with your set by placing them on the track and running them back and forth over the terminal rerailer until they glide smoothly. Then gently push the cars together – they will engage automatically.
- Do not try to connect cars when positioned over an under-track magnet.
How to Use E-Z Mate Couplers (HO and On30 Scale)
- Your set may be equipped with E-Z Mate magnetically operated knuckle couplers that let you perform real railroad switching and yard operations.
- Coupling two cars with E-Z Mate couplers is as easy as pushing them together when they are not over an under-track magnet.
- Uncoupling occurs only when over an under-track magnet and when there is no tension between the cars.
- To uncouple E-Z Mate couplers, stop two couplers directly over the under-track magnet. With no tension between the cars, the couplers will open automatically.
- If cars will not couple, check to be sure cars are not positioned over the uncoupling magnet or parked on a curve.
- If cars will not uncouple, check to be sure the couplers are positioned directly adjacent to the magnet position indicator and that the indicator is placed in line with the center line of the under-track magnet.
- Check that the magnet is secured to the underside of the track and fitted with the steel plate provided.
How to Run Your Train
- Turn the knob on the speed controller clockwise until it stops (all the way to the left).
- Plug in the power supply.
- Begin feeding power to the track by slowly turning the knob on the speed controller clockwise.
- Observe the direction of your train.
- If it moves backwards when the controls indicate forward, stop the train.
- Then simply disconnect, flip, and reconnect the terminal wire to the terminal rerailer track.
- Remember – never leave your train running unattended!
Action Checklist (Troubleshooting If Your Train Doesn’t Run or Stops Running)
- Is the power supply plugged in to a live receptacle?
- Are the wheels on the track?
- Is the wiring secure?
- Is the track properly assembled?
- Is the track properly seated in the rail joiner?
- If your train stops or fails to start, a short circuit may be indicated. If this is the case, Unplug The Power Supply Immediately.
- Common reasons for a short circuit: derailed wheels may cause a short. Check to make sure all wheels are on the track. Also check all connections and make sure there is no metal of any sort across the rails.
- After checking everything carefully, resume operation.
- Please note, your power supply is protected by a circuit breaker that automatically resets after a short circuit is corrected.
- Allow up to 5 minutes for the circuit breaker to reset before resuming operation.
Keep Your Train in Top Operating Condition
- Works better after couple hours of break-in time.
- Train performs best under clean operating conditions.
- Clean wheels and a clean track ensure good electrical contact.
- After about every 8 hours of operation, wipe the track rails and exposed wheels with a soft, lint-free cloth.
- Removal of black residue is normal.
- Do Not Use Steel Wool To Clean Your Track.
- Do not use common solvents, they may damage plastics - use track cleaner.
- After 24 hours of use, light lubrication is required to keep train in top operating condition. Bachmann E-Z Lube or other hobby-grade lubricants are recommended.
Bachmann hopes you enjoy your train for many years to come!

Bachmann Trains - Harvest Express Ready To Run Electric Train Set - HO Scale
Bachmann Trains
Product description
HARVEST EXPRESS Ready to Run Electric Train Set - HO Scale. Streaking through the golden wheat fields of central Canada is the Harvest Express. As it hauls colorful hoppers bursting with grain, its powerful EMD G engine ensures a bountiful harvest is swiftly delivered across the vast Canadian landscape. This complete ready to run electric train set includes; EMD GP40 diesel locomotive with operating headlight, three Canadian 4-bay cylindrical grain hoppers, body-mounted E-Z mat(R)couplers, 47" X 38" oval of snap-fit E-Z track(R), power pack, speed controller, and instruction manual.
- Complete Ready To Run Freight Train Set
- Powered by a EMD GP40 Diesel Locomotive with Operating Headlight
- Includes; Three Canadian 4-Bay Cylindrical Grain Hoppers
- 47" x 38" Oval of Snap-Fit E-Z Track, Power Pack and Speed Controller
- HO Scale 1:87
User questions & answers
| Question: | Is this set operable with the bachman dcc |
| Answer: | It comes in a box. No bag with it. |
| Question: | Does this train have sound and lights |
| Answer: | Hi, no. These aren't magnetic. |
| Question: | i have amazon prime, why is it taking a week to ship |
| Answer: | just received today I did count 100 pieces mostly all squares only has 5 triangles in box not very functional to build |
| Question: | Is this engine DCC ready |
| Answer: | NO! These pieces are Tiny! Too small for even my 4 year-old to play with (and she has great fine motor skills). We returned them. They are barely big enough for building houses for lego figures. |
Product features
Discover Everything Bachmann Trains Offers to Get Started in Model Railroading
Since 1833, Bachmann has been known for providing innovative design at a good value. We are now one of the world's largest distributor, by volume, of ready-to-run train sets, locomotives, track, and accessories. Bachmann is also the only train company to offer products in all five of the most popular scales: N, HO, On30, O, and Large Scale.
As a distributor of beloved Thomas & Friends products, Bachmann brings the adventures of Thomas the Tank Engine to life with a growing line of complete train sets, separate sale items, and accessories for children from 8 to 80-just add your imagination. Thomas & Friends is available in both HO and Large Scale.
Bachmann's exclusive snap-together E-Z Track System makes track setup quick, easy, and fun. Plasticville U.S.A. and SceneScapes buildings and accessories let you add the finishing touches for the perfect layout.
If You Are Purchasing a Train Set, It Will Include
- Locomotive
- Cars (Rolling Stock)
- E-Z Track – available in either black roadbed with steel alloy rail or gray roadbed with nickel silver rail
- Terminal/Rerailer
- Terminal Wire
- Speed Controller
- Power Supply
- List of Components
Track Assembly
- Decide where to set up your train – a dry, firm, flat surface works best!
- To make sure you have enough working room, make a test track layout by loosely placing track in desired configuration.
- The terminal/rerailer section will later be connected to a power pack and power supply, so place it near an outlet or power strip.
- Install under-track magnet, if your set comes with one. If your set does not come with one, magnets are available separately (HO Item No. 78999; N Scale Item No. 78998).
- Assemble the track by pushing together. Make sure the rail and joiners are seated properly. Be careful that the rail joiners do not slip under the rail without properly connecting. This can cause train derailments and electrical circuit interruptions.
- After track is assembled, double-check for joint connection and fit by lightly running your fingers over the top of the rails in both directions.
- If you detect bumps or distortion on the track surface, recheck the rail joiner fit.
Power Connections
- Power supply and speed control are plug and play; no tools are needed.
- Power is supplied to the track and the locomotive by the power supply, speed controller, terminal wire, and E-Z Track terminal/rerailer.
- First – turn knob on the speed controller counterclockwise until it stops (all the way to the left).
- Next – attach terminal wire to the speed controller by plugging it in where it says 'To Track.'
- Then – plug terminal wire into the E-Z Track terminal rerailer. Firmly push connector onto the track terminals.
- Finally – plug the connecting wire from the power supply into jack on the speed controller labeled 'In.' Then plug power supply into a live wall outlet.
- Some sets may come with a speed controller with two push button connectors. These are used to supply AC power to accessories.
- To make positive and secure connections to these, push in buttons and insert each of the bare ends of the connection wire from your accessory.
- The speed controller is capable of powering one accessory at a time.
Putting the Train on the Track
- Put the locomotive on the track and run the wheels back and forth over the terminal rerailer track.
- When the wheels glide smoothly over the track, you know the wheels are all on the track. If your set comes with a tender, attach it to the locomotive.
- Add the rest of the cars that come with your set by placing them on the track and running them back and forth over the terminal rerailer until they glide smoothly. Then gently push the cars together – they will engage automatically.
- Do not try to connect cars when positioned over an under-track magnet.
How to Use E-Z Mate Couplers (HO and On30 Scale)
- Your set may be equipped with E-Z Mate magnetically operated knuckle couplers that let you perform real railroad switching and yard operations.
- Coupling two cars with E-Z Mate couplers is as easy as pushing them together when they are not over an under-track magnet.
- Uncoupling occurs only when over an under-track magnet and when there is no tension between the cars.
- To uncouple E-Z Mate couplers, stop two couplers directly over the under-track magnet. With no tension between the cars, the couplers will open automatically.
- If cars will not couple, check to be sure cars are not positioned over the uncoupling magnet or parked on a curve.
- If cars will not uncouple, check to be sure the couplers are positioned directly adjacent to the magnet position indicator and that the indicator is placed in line with the center line of the under-track magnet.
- Check that the magnet is secured to the underside of the track and fitted with the steel plate provided.
How to Run Your Train
- Turn the knob on the speed controller clockwise until it stops (all the way to the left).
- Plug in the power supply.
- Begin feeding power to the track by slowly turning the knob on the speed controller clockwise.
- Observe the direction of your train.
- If it moves backwards when the controls indicate forward, stop the train.
- Then simply disconnect, flip, and reconnect the terminal wire to the terminal rerailer track.
- Remember – never leave your train running unattended!
Action Checklist (Troubleshooting If Your Train Doesn’t Run or Stops Running)
- Is the power supply plugged in to a live receptacle?
- Are the wheels on the track?
- Is the wiring secure?
- Is the track properly assembled?
- Is the track properly seated in the rail joiner?
- If your train stops or fails to start, a short circuit may be indicated. If this is the case, Unplug The Power Supply Immediately.
- Common reasons for a short circuit: derailed wheels may cause a short. Check to make sure all wheels are on the track. Also check all connections and make sure there is no metal of any sort across the rails.
- After checking everything carefully, resume operation.
- Please note, your power supply is protected by a circuit breaker that automatically resets after a short circuit is corrected.
- Allow up to 5 minutes for the circuit breaker to reset before resuming operation.
Keep Your Train in Top Operating Condition
- Works better after couple hours of break-in time.
- Train performs best under clean operating conditions.
- Clean wheels and a clean track ensure good electrical contact.
- After about every 8 hours of operation, wipe the track rails and exposed wheels with a soft, lint-free cloth.
- Removal of black residue is normal.
- Do Not Use Steel Wool To Clean Your Track.
- Do not use common solvents, they may damage plastics - use track cleaner.
- After 24 hours of use, light lubrication is required to keep train in top operating condition. Bachmann E-Z Lube or other hobby-grade lubricants are recommended.
Bachmann hopes you enjoy your train for many years to come!

Bachmann Trains - DCC-Equipped Motorized Electric Turntable - HO Scale
Bachmann Trains
Product description
DCC-EQUIPPED MOTORIZED ELECTRIC TURNTABLE - HO Scale. Bring your entire model railroad together in one place and get your electric trains on track fast with the Bachmann Trains HO Scale DCC Motorized E-Z Track Turntable. Designed for HO Scale E-Z Track, this turntable is also compatible with smaller On30 Scale engines as well as other popular track systems. This easy to operate turntable features a motorized gear drive and indexing so, when you flip the switch, it accurately aligns the bridge with any of the 16 nickel silver track positions. Additional features include DCC-equipped with dual-mode NMRA-compliant decoder, switch and wires provided for DC (analog) operation if desired, Turntable Bridge is 10", outside diameter is 14", painted maintenance building and prototypical operator’s cabin included. (Note: Locomotive is not included).
- DCC-equipped with dual-mode NMRA-compliant decoder, 16 nickel silver track positions
- Gear drive, turntable indexed to each track section for accurate alignment
- Spring-loaded direction switch and wires provided for DC (analog) operation if desired
- Turntable bridge is 10"; outside diameter is 14", painted maintenance building and prototypical operator’s cabin
- Designed for use with Bachmann’s HO Scale E-Z Track , and is easily adaptable to other popular track systems. (Note: Locomotive is not included. )
Product features
Discover Everything Bachmann Trains Offers to Get Started in Model Railroading
Since 1833, Bachmann has been known for providing innovative design at a good value. We are now one of the world's largest distributor, by volume, of ready-to-run train sets, locomotives, track, and accessories. Bachmann is also the only train company to offer products in all five of the most popular scales: N, HO, On30, O, and Large Scale.
As a distributor of beloved Thomas & Friends products, Bachmann brings the adventures of Thomas the Tank Engine to life with a growing line of complete train sets, separate sale items, and accessories for children from 8 to 80-just add your imagination. Thomas & Friends is available in both HO and Large Scale.
Bachmann's exclusive snap-together E-Z Track System makes track setup quick, easy, and fun. Plasticville U.S.A. and SceneScapes buildings and accessories let you add the finishing touches for the perfect layout.
If You Are Purchasing a Train Set, It Will Include
- Locomotive
- Cars (Rolling Stock)
- E-Z Track – available in either black roadbed with steel alloy rail or gray roadbed with nickel silver rail
- Terminal/Rerailer
- Terminal Wire
- Speed Controller
- Power Supply
- List of Components
Track Assembly
- Decide where to set up your train – a dry, firm, flat surface works best!
- To make sure you have enough working room, make a test track layout by loosely placing track in desired configuration.
- The terminal/rerailer section will later be connected to a power pack and power supply, so place it near an outlet or power strip.
- Install under-track magnet, if your set comes with one. If your set does not come with one, magnets are available separately (HO Item No. 78999; N Scale Item No. 78998).
- Assemble the track by pushing together. Make sure the rail and joiners are seated properly. Be careful that the rail joiners do not slip under the rail without properly connecting. This can cause train derailments and electrical circuit interruptions.
- After track is assembled, double-check for joint connection and fit by lightly running your fingers over the top of the rails in both directions.
- If you detect bumps or distortion on the track surface, recheck the rail joiner fit.
Power Connections
- Power supply and speed control are plug and play; no tools are needed.
- Power is supplied to the track and the locomotive by the power supply, speed controller, terminal wire, and E-Z Track terminal/rerailer.
- First – turn knob on the speed controller counterclockwise until it stops (all the way to the left).
- Next – attach terminal wire to the speed controller by plugging it in where it says 'To Track'.
- Then – plug terminal wire into the E-Z Track terminal rerailer. Firmly push connector onto the track terminals.
- Finally – plug the connecting wire from the power supply into jack on the speed controller labeled 'In'. Then plug power supply into a live wall outlet.
- Some sets may come with a speed controller with two push button connectors. These are used to supply AC power to accessories.
- To make positive and secure connections to these, push in buttons and insert each of the bare ends of the connection wire from your accessory.
- The speed controller is capable of powering one accessory at a time.
Putting the Train on the Track
- Put the locomotive on the track and run the wheels back and forth over the terminal rerailer track.
- When the wheels glide smoothly over the track, you know the wheels are all on the track. If your set comes with a tender, attach it to the locomotive.
- Add the rest of the cars that come with your set by placing them on the track and running them back and forth over the terminal rerailer until they glide smoothly. Then gently push the cars together – they will engage automatically.
- Do not try to connect cars when positioned over an under-track magnet.
How to Use E-Z Mate Couplers (HO and On30 Scale)
- Your set may be equipped with E-Z Mate magnetically operated knuckle couplers that let you perform real railroad switching and yard operations.
- Coupling two cars with E-Z Mate couplers is as easy as pushing them together when they are not over an under-track magnet.
- Uncoupling occurs only when over an under-track magnet and when there is no tension between the cars.
- To uncouple E-Z Mate couplers, stop two couplers directly over the under-track magnet. With no tension between the cars, the couplers will open automatically.
- If cars will not couple, check to be sure cars are not positioned over the uncoupling magnet or parked on a curve.
- If cars will not uncouple, check to be sure the couplers are positioned directly adjacent to the magnet position indicator and that the indicator is placed in line with the center line of the under-track magnet.
- Check that the magnet is secured to the underside of the track and fitted with the steel plate provided.
How to Run Your Train
- Turn the knob on the speed controller clockwise until it stops (all the way to the left).
- Plug in the power supply.
- Begin feeding power to the track by slowly turning the knob on the speed controller clockwise.
- Observe the direction of your train.
- If it moves backwards when the controls indicate forward, stop the train.
- Then simply disconnect, flip, and reconnect the terminal wire to the terminal rerailer track.
- Remember – never leave your train running unattended!
Action Checklist (Troubleshooting If Your Train Doesn’t Run or Stops Running)
- Is the power supply plugged in to a live receptacle?
- Are the wheels on the track?
- Is the wiring secure?
- Is the track properly assembled?
- Is the track properly seated in the rail joiner?
- If your train stops or fails to start, a short circuit may be indicated. If this is the case, Unplug The Power Supply Immediately.
- Common reasons for a short circuit: derailed wheels may cause a short. Check to make sure all wheels are on the track. Also check all connections and make sure there is no metal of any sort across the rails.
- After checking everything carefully, resume operation.
- Please note, your power supply is protected by a circuit breaker that automatically resets after a short circuit is corrected.
- Allow up to 5 minutes for the circuit breaker to reset before resuming operation.
Keep Your Train in Top Operating Condition
- Works better after couple hours of break-in time.
- Train performs best under clean operating conditions.
- Clean wheels and a clean track ensure good electrical contact.
- After about every 8 hours of operation, wipe the track rails and exposed wheels with a soft, lint-free cloth.
- Removal of black residue is normal.
- Do Not Use Steel Wool To Clean Your Track.
- Do not use common solvents, they may damage plastics - use track cleaner.
- After 24 hours of use, light lubrication is required to keep train in top operating condition. Bachmann E-Z Lube or other hobby-grade lubricants are recommended.
Bachmann hopes you enjoy your train for many years to come!

Bachmann Trains - Thoroughbred Ready To Run Electric Train Set - HO Scale
Bachmann Trains
Product description
Thoroughbred Ready To Run Electric Train Set - HO Scale. Wheels rumble like the pounding of hooves as this iron horse rounds the bend. Hauling freight with the ease and grace of a champion, the Thoroughbred delivers fun and adventure to your stable of trains. View video to see this set in action. This ready-to-run train set includes: F7 diesel locomotive with operating headlight, open quad hopper, gondola, wide-vision caboose, body-mounted E-Z Mate couplers,47" x 38" oval of snap-fit E-Z Track including 12 pieces of curved track, 1 piece of straight track and 1 plug-in terminal rerailer, power pack and speed controller, illustrated instruction manual.
From the Manufacturer
Wheels rumble like the pounding of hooves as this iron horse rounds the bend. Hauling freight with the ease and grace of a champion the Thoroughbred delivers fun and adventure to your stable of trains.
- Complete Ready To Run Freight Train Set
- Powered by a F7 Diesel Locomotive with Operating Headlight
- Includes; Open Quad Hopper Car, Gondola Car, and Wide-Vision Caboose
- 47" x 38" Oval of Snap-Fit E-Z Track, Power Pack and Speed Controller
- HO Scale 1:87
User questions & answers
| Question: | does the power pack work in australi |
| Answer: | If you guys use 220 volt, this will NOT work over there. This use 110 volt only. |
| Question: | is this train electric or battery powered remote controled |
| Answer: | 110v transformer controls it. no batteries |
| Question: | Does the engine blow smoke |
| Answer: | No, the engine does not blow smoke. Usually only the steam engine replicas do and not all. If the train does have a "smoker" it will be clearly advertised on the package. It is an option many want so it will be promoted clearly on the packaging. |
| Question: | Can these trains pull more cars if I expand |
| Answer: | yes. he could pull 10 cars |
Product features
Discover Everything Bachmann Trains Offers to Get Started in Model Railroading
Since 1833, Bachmann has been known for providing innovative design at a good value. We are now one of the world's largest distributor, by volume, of ready-to-run train sets, locomotives, track, and accessories. Bachmann is also the only train company to offer products in all five of the most popular scales: N, HO, On30, O, and Large Scale.
As a distributor of beloved Thomas & Friends products, Bachmann brings the adventures of Thomas the Tank Engine to life with a growing line of complete train sets, separate sale items, and accessories for children from 8 to 80-just add your imagination. Thomas & Friends is available in both HO and Large Scale.
Bachmann's exclusive snap-together E-Z Track System makes track setup quick, easy, and fun. Plasticville U.S.A. and SceneScapes buildings and accessories let you add the finishing touches for the perfect layout.
If You Are Purchasing a Train Set, It Will Include
- Locomotive
- Cars (Rolling Stock)
- E-Z Track – available in either black roadbed with steel alloy rail or gray roadbed with nickel silver rail
- Terminal/Rerailer
- Terminal Wire
- Speed Controller
- Power Supply
- List of Components
Track Assembly
- Decide where to set up your train – a dry, firm, flat surface works best!
- To make sure you have enough working room, make a test track layout by loosely placing track in desired configuration.
- The terminal/rerailer section will later be connected to a power pack and power supply, so place it near an outlet or power strip.
- Install under-track magnet, if your set comes with one. If your set does not come with one, magnets are available separately (HO Item No. 78999; N Scale Item No. 78998).
- Assemble the track by pushing together. Make sure the rail and joiners are seated properly. Be careful that the rail joiners do not slip under the rail without properly connecting. This can cause train derailments and electrical circuit interruptions.
- After track is assembled, double-check for joint connection and fit by lightly running your fingers over the top of the rails in both directions.
- If you detect bumps or distortion on the track surface, recheck the rail joiner fit.
Power Connections
- Power supply and speed control are plug and play; no tools are needed.
- Power is supplied to the track and the locomotive by the power supply, speed controller, terminal wire, and E-Z Track terminal/rerailer.
- First – turn knob on the speed controller counterclockwise until it stops (all the way to the left).
- Next – attach terminal wire to the speed controller by plugging it in where it says 'To Track.'
- Then – plug terminal wire into the E-Z Track terminal rerailer. Firmly push connector onto the track terminals.
- Finally – plug the connecting wire from the power supply into jack on the speed controller labeled 'In.' Then plug power supply into a live wall outlet.
- Some sets may come with a speed controller with two push button connectors. These are used to supply AC power to accessories.
- To make positive and secure connections to these, push in buttons and insert each of the bare ends of the connection wire from your accessory.
- The speed controller is capable of powering one accessory at a time.
Putting the Train on the Track
- Put the locomotive on the track and run the wheels back and forth over the terminal rerailer track.
- When the wheels glide smoothly over the track, you know the wheels are all on the track. If your set comes with a tender, attach it to the locomotive.
- Add the rest of the cars that come with your set by placing them on the track and running them back and forth over the terminal rerailer until they glide smoothly. Then gently push the cars together – they will engage automatically.
- Do not try to connect cars when positioned over an under-track magnet.
How to Use E-Z Mate Couplers (HO and On30 Scale)
- Your set may be equipped with E-Z Mate magnetically operated knuckle couplers that let you perform real railroad switching and yard operations.
- Coupling two cars with E-Z Mate couplers is as easy as pushing them together when they are not over an under-track magnet.
- Uncoupling occurs only when over an under-track magnet and when there is no tension between the cars.
- To uncouple E-Z Mate couplers, stop two couplers directly over the under-track magnet. With no tension between the cars, the couplers will open automatically.
- If cars will not couple, check to be sure cars are not positioned over the uncoupling magnet or parked on a curve.
- If cars will not uncouple, check to be sure the couplers are positioned directly adjacent to the magnet position indicator and that the indicator is placed in line with the center line of the under-track magnet.
- Check that the magnet is secured to the underside of the track and fitted with the steel plate provided.
How to Run Your Train
- Turn the knob on the speed controller clockwise until it stops (all the way to the left).
- Plug in the power supply.
- Begin feeding power to the track by slowly turning the knob on the speed controller clockwise.
- Observe the direction of your train.
- If it moves backwards when the controls indicate forward, stop the train.
- Then simply disconnect, flip, and reconnect the terminal wire to the terminal rerailer track.
- Remember – never leave your train running unattended!
Action Checklist (Troubleshooting If Your Train Doesn’t Run or Stops Running)
- Is the power supply plugged in to a live receptacle?
- Are the wheels on the track?
- Is the wiring secure?
- Is the track properly assembled?
- Is the track properly seated in the rail joiner?
- If your train stops or fails to start, a short circuit may be indicated. If this is the case, Unplug The Power Supply Immediately.
- Common reasons for a short circuit: derailed wheels may cause a short. Check to make sure all wheels are on the track. Also check all connections and make sure there is no metal of any sort across the rails.
- After checking everything carefully, resume operation.
- Please note, your power supply is protected by a circuit breaker that automatically resets after a short circuit is corrected.
- Allow up to 5 minutes for the circuit breaker to reset before resuming operation.
Keep Your Train in Top Operating Condition
- Works better after couple hours of break-in time.
- Train performs best under clean operating conditions.
- Clean wheels and a clean track ensure good electrical contact.
- After about every 8 hours of operation, wipe the track rails and exposed wheels with a soft, lint-free cloth.
- Removal of black residue is normal.
- Do Not Use Steel Wool To Clean Your Track.
- Do not use common solvents, they may damage plastics - use track cleaner.
- After 24 hours of use, light lubrication is required to keep train in top operating condition. Bachmann E-Z Lube or other hobby-grade lubricants are recommended.
Bachmann hopes you enjoy your train for many years to come!
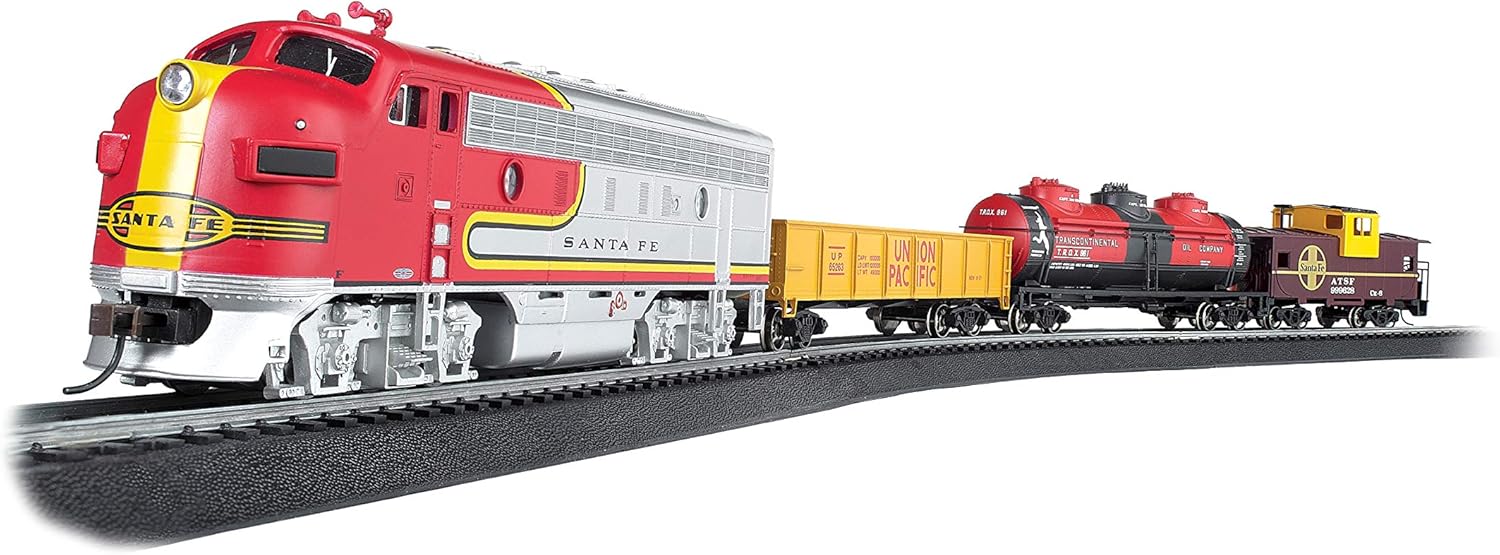
Bachmann Trains - Canyon Chief Ready To Run Electric Train Set - HO Scale
Bachmann Trains
Product description
Canyon Chief ready to run Electric train set - HO scale. Navigating with ease past the deep gorges and steep mesas of the Southwest landscape is the Canyon Chief. Commanded by a Santa Fe EMD F7 in the iconic “war bonnet” paint scheme, the unyielding Canyon Chief always delivers Its freight load on time. This ready-to-run train set includes: F7 diesel locomotive with operating headlight, three-dome tank car, gondola car, wide-vision caboose, 36" Circle of snap-fit E-Z track, power pack and speed controller, illustrated instruction manual
- Complete Ready To Run Freight Train Set
- Powered by a F7 Diesel Locomotive with Operating Headlight
- Includes; Three Dome Tank Car, Gondola Car, and Wide-Vision Caboose
- 36" Circle of Snap-fit E-Z Track, Power Pack and Speed Controller
- HO Scale 1:87
User questions & answers
| Question: | Has anybody had trouble with the track connectors breaking on them? I have, and wonder what I'm doing wrong |
| Answer: | Yes, it works with DCC controller as well. I can be controlled by first switching button number 10, and then controlling the speed and direction of the DCC controller. |
| Question: | Is this HO scale |
| Answer: | This train has lights but no sound. -Nicholas Smith Trains |
| Question: | Dose it have sound |
| Answer: | Not all vendors selling this item participate in the Amazon Prime program. If they are offering Prime shipping, then their own shipping guidelines apply. |
| Question: | Dose it have sound |
| Answer: | The Locomotive supplied with Harvester set is not x DCC ready. as I have checked box / package and no reference to being adapted for digital chip |
Product features
Discover Everything Bachmann Trains Offers to Get Started in Model Railroading
Since 1833, Bachmann has been known for providing innovative design at a good value. We are now one of the world's largest distributor, by volume, of ready-to-run train sets, locomotives, track, and accessories. Bachmann is also the only train company to offer products in all five of the most popular scales: N, HO, On30, O, and Large Scale.
As a distributor of beloved Thomas & Friends products, Bachmann brings the adventures of Thomas the Tank Engine to life with a growing line of complete train sets, separate sale items, and accessories for children from 8 to 80-just add your imagination. Thomas & Friends is available in both HO and Large Scale.
Bachmann's exclusive snap-together E-Z Track System makes track setup quick, easy, and fun. Plasticville U.S.A. and SceneScapes buildings and accessories let you add the finishing touches for the perfect layout.
If You Are Purchasing a Train Set, It Will Include
- Locomotive
- Cars (Rolling Stock)
- E-Z Track – available in either black roadbed with steel alloy rail or gray roadbed with nickel silver rail
- Terminal/Rerailer
- Terminal Wire
- Speed Controller
- Power Supply
- List of Components
Track Assembly
- Decide where to set up your train – a dry, firm, flat surface works best!
- To make sure you have enough working room, make a test track layout by loosely placing track in desired configuration.
- The terminal/rerailer section will later be connected to a power pack and power supply, so place it near an outlet or power strip.
- Install under-track magnet, if your set comes with one. If your set does not come with one, magnets are available separately (HO Item No. 78999; N Scale Item No. 78998).
- Assemble the track by pushing together. Make sure the rail and joiners are seated properly. Be careful that the rail joiners do not slip under the rail without properly connecting. This can cause train derailments and electrical circuit interruptions.
- After track is assembled, double-check for joint connection and fit by lightly running your fingers over the top of the rails in both directions.
- If you detect bumps or distortion on the track surface, recheck the rail joiner fit.
Power Connections
- Power supply and speed control are plug and play; no tools are needed.
- Power is supplied to the track and the locomotive by the power supply, speed controller, terminal wire, and E-Z Track terminal/rerailer.
- First – turn knob on the speed controller counterclockwise until it stops (all the way to the left).
- Next – attach terminal wire to the speed controller by plugging it in where it says 'To Track.'
- Then – plug terminal wire into the E-Z Track terminal rerailer. Firmly push connector onto the track terminals.
- Finally – plug the connecting wire from the power supply into jack on the speed controller labeled 'In.' Then plug power supply into a live wall outlet.
- Some sets may come with a speed controller with two push button connectors. These are used to supply AC power to accessories.
- To make positive and secure connections to these, push in buttons and insert each of the bare ends of the connection wire from your accessory.
- The speed controller is capable of powering one accessory at a time.
Putting the Train on the Track
- Put the locomotive on the track and run the wheels back and forth over the terminal rerailer track.
- When the wheels glide smoothly over the track, you know the wheels are all on the track. If your set comes with a tender, attach it to the locomotive.
- Add the rest of the cars that come with your set by placing them on the track and running them back and forth over the terminal rerailer until they glide smoothly. Then gently push the cars together – they will engage automatically.
- Do not try to connect cars when positioned over an under-track magnet.
How to Use E-Z Mate Couplers (HO and On30 Scale)
- Your set may be equipped with E-Z Mate magnetically operated knuckle couplers that let you perform real railroad switching and yard operations.
- Coupling two cars with E-Z Mate couplers is as easy as pushing them together when they are not over an under-track magnet.
- Uncoupling occurs only when over an under-track magnet and when there is no tension between the cars.
- To uncouple E-Z Mate couplers, stop two couplers directly over the under-track magnet. With no tension between the cars, the couplers will open automatically.
- If cars will not couple, check to be sure cars are not positioned over the uncoupling magnet or parked on a curve.
- If cars will not uncouple, check to be sure the couplers are positioned directly adjacent to the magnet position indicator and that the indicator is placed in line with the center line of the under-track magnet.
- Check that the magnet is secured to the underside of the track and fitted with the steel plate provided.
How to Run Your Train
- Turn the knob on the speed controller clockwise until it stops (all the way to the left).
- Plug in the power supply.
- Begin feeding power to the track by slowly turning the knob on the speed controller clockwise.
- Observe the direction of your train.
- If it moves backwards when the controls indicate forward, stop the train.
- Then simply disconnect, flip, and reconnect the terminal wire to the terminal rerailer track.
- Remember – never leave your train running unattended!
Action Checklist (Troubleshooting If Your Train Doesn’t Run or Stops Running)
- Is the power supply plugged in to a live receptacle?
- Are the wheels on the track?
- Is the wiring secure?
- Is the track properly assembled?
- Is the track properly seated in the rail joiner?
- If your train stops or fails to start, a short circuit may be indicated. If this is the case, Unplug The Power Supply Immediately.
- Common reasons for a short circuit: derailed wheels may cause a short. Check to make sure all wheels are on the track. Also check all connections and make sure there is no metal of any sort across the rails.
- After checking everything carefully, resume operation.
- Please note, your power supply is protected by a circuit breaker that automatically resets after a short circuit is corrected.
- Allow up to 5 minutes for the circuit breaker to reset before resuming operation.
Keep Your Train in Top Operating Condition
- Works better after couple hours of break-in time.
- Train performs best under clean operating conditions.
- Clean wheels and a clean track ensure good electrical contact.
- After about every 8 hours of operation, wipe the track rails and exposed wheels with a soft, lint-free cloth.
- Removal of black residue is normal.
- Do Not Use Steel Wool To Clean Your Track.
- Do not use common solvents, they may damage plastics - use track cleaner.
- After 24 hours of use, light lubrication is required to keep train in top operating condition. Bachmann E-Z Lube or other hobby-grade lubricants are recommended.
Bachmann hopes you enjoy your train for many years to come!
Latest Reviews
View all
Professional Scooter For Adults
- Updated: 12.05.2023
- Read reviews
Decorative Panels
- Updated: 27.03.2023
- Read reviews

Parrot Rechargeable Batteries
- Updated: 11.02.2023
- Read reviews

Shower Head With Hose Holders
- Updated: 23.07.2023
- Read reviews

B M C Toddler Toys
- Updated: 21.05.2023
- Read reviews