7 best small trampoline with net
A small trampoline with a net, also known as a mini trampoline or rebounder with enclosure, is a recreational and fitness equipment designed for both fun and exercise. Here's what you should know about it:
Design: A small trampoline with a net typically consists of a circular or oval-shaped bouncing surface, a strong metal frame, and a safety net enclosure. The netting surrounds the jumping area to prevent users from falling off the trampoline.
Size: These trampolines are smaller in diameter compared to full-sized outdoor trampolines. They are often designed for single users or a few individuals at a time, making them suitable for indoor or backyard use.
Safety Enclosure: The safety netting, also referred to as a safety enclosure or net, is a critical safety feature. It is securely attached to the frame and prevents users from accidentally bouncing off the trampoline and onto the ground.
Bounce Surface: The bouncing surface, typically made of a strong, elastic material like polypropylene, is designed to provide a springy and responsive bounce. Some models come with padded covers to enhance safety and comfort.
Frame: The frame of a small trampoline is made from durable materials like steel or aluminum to provide stability and support for users while jumping.
Indoor and Outdoor Use: Depending on the size and design, these trampolines can be used indoors or outdoors. Indoor models are often smaller and foldable for easy storage when not in use.
Exercise Benefits: Small trampolines are used for fitness and exercise routines, commonly referred to as "rebounding." This low-impact exercise is effective for cardiovascular fitness, toning muscles, and improving balance and coordination.
Fun and Entertainment: Beyond exercise, mini trampolines are also used for recreational purposes, providing entertainment and enjoyment for users of all ages.
Assembly and Maintenance: Most small trampolines come with assembly instructions, and they are relatively easy to set up. Maintenance typically involves occasional checks of the frame, net, and springs for wear and tear.
Accessories: Some trampolines may come with additional accessories like handlebars for added stability during workouts, or music systems for added entertainment value.
Safety Precautions: While small trampolines with nets offer safety features, users should still follow safety guidelines. This includes using the trampoline one person at a time, not attempting dangerous stunts, and adhering to weight limits.
Availability: You can find small trampolines with nets in sporting goods stores, online retailers, and at specialized trampoline stores. They are available in various sizes and styles to suit different preferences and needs.
In summary, a small trampoline with a net is a compact and safer alternative to traditional outdoor trampolines. It offers both fitness benefits and recreational enjoyment while incorporating safety features like enclosures and padded surfaces to reduce the risk of injury during use. These trampolines are suitable for indoor or outdoor use, depending on the model, and are available in various sizes to accommodate different spaces and user requirements.
Below you can find our editor's choice of the best small trampoline with net on the market
Bachmann Trains - Trailblazer Ready To Run 60 Piece Electric Train Set - N Scale
Bachmann Trains
Product description
Bachmann Trains TRAILBLAZER - N Scale Ready to Run Electric Train Set. As the West developed from desolate wilderness to bustling cities, it was trains such as the Trailblazer that spearheaded America's explosive growth from coast to coast. Our 60-piece Trailblazer set with its 4-6-0 locomotive lets you experience all the excitement of the Iron Horse's journeys through the crossroads of railroading history! This ready-to-run train set includes; 4-6-0 steam locomotive and tender with operating headlight, box car, gondola car, single-dome tank car, old-time caboose, 34" x 24" oval of snap-fit E-Z Track, train station, 24 railroad and street signs, 12 telephone poles, power pack and speed controller, illustrated instruction manual.
- Complete Ready To Run 60 Piece Freight Train Set
- Powered by a 4-6-0 Steam Era Locomotive and Tender with Operating Headlight
- Includes; Box Car, Gondola Car, Single-Dome Tank Car, Old-Time Caboose, Railroad Signs, Street Signs, and Telephone Poles
- 34" x 24" Oval of Nickel Silver E-Z Track , Power Pack and Speed Controller
- N Scale 1:160
- Recommended For Ages 14 & Up
User questions & answers
| Question: | Does this come with steam sound effects? If not how can I add steam sound effects |
| Answer: | no and you would have to buy a engine with sound |
| Question: | Are the trains themselves plastic or die-cast metal |
| Answer: | plastic with metal wheels (and working light in front!). die cast would be too heavy at this size i imagine. i one to go around a mini christmas tree this last season. it was perfect. |
Product features
Discover Everything Bachmann Trains Offers to Get Started in Model Railroading
Since 1833, Bachmann has been known for providing innovative design at a good value. We are now one of the world's largest distributor, by volume, of ready-to-run train sets, locomotives, track, and accessories. Bachmann is also the only train company to offer products in all five of the most popular scales: N, HO, On30, O, and Large Scale.
As a distributor of beloved Thomas & Friends products, Bachmann brings the adventures of Thomas the Tank Engine to life with a growing line of complete train sets, separate sale items, and accessories for children from 8 to 80-just add your imagination. Thomas & Friends is available in both HO and Large Scale.
Bachmann's exclusive snap-together E-Z Track System makes track setup quick, easy, and fun. Plasticville U.S.A. and SceneScapes buildings and accessories let you add the finishing touches for the perfect layout.
If You Are Purchasing a Train Set, It Will Include
- Locomotive
- Cars (Rolling Stock)
- E-Z Track – available in either black roadbed with steel alloy rail or gray roadbed with nickel silver rail
- Terminal/Rerailer
- Terminal Wire
- Speed Controller
- Power Supply
- List of Components
Track Assembly
- Decide where to set up your train – a dry, firm, flat surface works best!
- To make sure you have enough working room, make a test track layout by loosely placing track in desired configuration.
- The terminal/rerailer section will later be connected to a power pack and power supply, so place it near an outlet or power strip.
- Install under-track magnet, if your set comes with one. If your set does not come with one, magnets are available separately (HO Item No. 78999; N Scale Item No. 78998).
- Assemble the track by pushing together. Make sure the rail and joiners are seated properly. Be careful that the rail joiners do not slip under the rail without properly connecting. This can cause train derailments and electrical circuit interruptions.
- After track is assembled, double-check for joint connection and fit by lightly running your fingers over the top of the rails in both directions.
- If you detect bumps or distortion on the track surface, recheck the rail joiner fit.
Power Connections
- Power supply and speed control are plug and play; no tools are needed.
- Power is supplied to the track and the locomotive by the power supply, speed controller, terminal wire, and E-Z Track terminal/rerailer.
- First – turn knob on the speed controller counterclockwise until it stops (all the way to the left).
- Next – attach terminal wire to the speed controller by plugging it in where it says 'To Track.'
- Then – plug terminal wire into the E-Z Track terminal rerailer. Firmly push connector onto the track terminals.
- Finally – plug the connecting wire from the power supply into jack on the speed controller labeled 'In.' Then plug power supply into a live wall outlet.
- Some sets may come with a speed controller with two push button connectors. These are used to supply AC power to accessories.
- To make positive and secure connections to these, push in buttons and insert each of the bare ends of the connection wire from your accessory.
- The speed controller is capable of powering one accessory at a time.
Putting the Train on the Track
- Put the locomotive on the track and run the wheels back and forth over the terminal rerailer track.
- When the wheels glide smoothly over the track, you know the wheels are all on the track. If your set comes with a tender, attach it to the locomotive.
- Add the rest of the cars that come with your set by placing them on the track and running them back and forth over the terminal rerailer until they glide smoothly. Then gently push the cars together – they will engage automatically.
- Do not try to connect cars when positioned over an under-track magnet.
How to Use E-Z Mate Couplers (HO and On30 Scale)
- Your set may be equipped with E-Z Mate magnetically operated knuckle couplers that let you perform real railroad switching and yard operations.
- Coupling two cars with E-Z Mate couplers is as easy as pushing them together when they are not over an under-track magnet.
- Uncoupling occurs only when over an under-track magnet and when there is no tension between the cars.
- To uncouple E-Z Mate couplers, stop two couplers directly over the under-track magnet. With no tension between the cars, the couplers will open automatically.
- If cars will not couple, check to be sure cars are not positioned over the uncoupling magnet or parked on a curve.
- If cars will not uncouple, check to be sure the couplers are positioned directly adjacent to the magnet position indicator and that the indicator is placed in line with the center line of the under-track magnet.
- Check that the magnet is secured to the underside of the track and fitted with the steel plate provided.
How to Run Your Train
- Turn the knob on the speed controller clockwise until it stops (all the way to the left).
- Plug in the power supply.
- Begin feeding power to the track by slowly turning the knob on the speed controller clockwise.
- Observe the direction of your train.
- If it moves backwards when the controls indicate forward, stop the train.
- Then simply disconnect, flip, and reconnect the terminal wire to the terminal rerailer track.
- Remember – never leave your train running unattended!
Action Checklist (Troubleshooting If Your Train Doesn’t Run or Stops Running)
- Is the power supply plugged in to a live receptacle?
- Are the wheels on the track?
- Is the wiring secure?
- Is the track properly assembled?
- Is the track properly seated in the rail joiner?
- If your train stops or fails to start, a short circuit may be indicated. If this is the case, Unplug The Power Supply Immediately.
- Common reasons for a short circuit: derailed wheels may cause a short. Check to make sure all wheels are on the track. Also check all connections and make sure there is no metal of any sort across the rails.
- After checking everything carefully, resume operation.
- Please note, your power supply is protected by a circuit breaker that automatically resets after a short circuit is corrected.
- Allow up to 5 minutes for the circuit breaker to reset before resuming operation.
Keep Your Train in Top Operating Condition
- Works better after couple hours of break-in time.
- Train performs best under clean operating conditions.
- Clean wheels and a clean track ensure good electrical contact.
- After about every 8 hours of operation, wipe the track rails and exposed wheels with a soft, lint-free cloth.
- Removal of black residue is normal.
- Do Not Use Steel Wool To Clean Your Track.
- Do not use common solvents, they may damage plastics - use track cleaner.
- After 24 hours of use, light lubrication is required to keep train in top operating condition. Bachmann E-Z Lube or other hobby-grade lubricants are recommended.
Bachmann hopes you enjoy your train for many years to come!

Bachmann Trains - Digital Commander DCC Equipped Ready To Run Electric Train Set - HO Scale
Product description
Digital Commander DCC Equipped Ready To Run Electric Train Set - HO Scale. The Digital Commander has everything you need to get started in digital model railroading in one ready-to-run set! It includes our exclusive, easy-to-use E-Z Command digital system that lets you independently control the speed, direction, and lighting of two decoder-equipped locomotives. Take control of your own freight rail empire with the Digital Commander! This digitally controlled train set features: DCC-equipped EMD GP40 locomotive with operating headlight, DCC-equipped EMD FT-A locomotive with operating headlight, plug-door box car, open quad hopper, wide-vision caboose, E-Z Command Control Center with wall pack and plug-in wiring, body-mounted E-Z Mate couplers, 56" x 38" oval of nickel silver E-Z Track, including 12 pieces curved track, 4 pieces straight track, 1 terminal rerailer, 1 manual turnout - left, under-track magnet with brakeman figure, and 1 Hayes bumper, illustrated instruction manual.
From the Manufacturer
Model railroading enters the digital age with the Digital Commander! Create your own fledgeling railroad empire or work with a friend to coordinate freight and switching operations. Our exclusive E-Z Command digital control system lets you independently control the speed, direction, and lighting of two decoder-equipped locomotives.
- Complete Ready To Run Train Set With 2 DCC Equipped Locomotives and E-Z Command Digital Control System
- Powered by Two DCC Equipped Locomotives; a EMD GP40 Locomotive and a EMD FT-A Locomotive, Both with Operating Headlight
- Featuring Bachmann’s E-Z Command digital system that lets you independently control the speed, direction, and lighting of your decoder-equipped locomotives
- Includes; Plug Door Box Car, Open Quad Hopper Car, and Wide-Vision Caboose
- 56" x 38" Oval of Nickel Silver E-Z Track with Turnout and Siding, Power Pack and E-Z Command Controller. HO Scale 1:87
User questions & answers
| Question: | Can you use 2 controler to control each locomotive separately? What aditional controller can i get for it to control the second train |
| Answer: | It runs on all 3 oval tracks that I have. The smallest is 31/2' x 5'. I think it would run on a smaller radius layout. |
| Question: | I have a different bachmann set that uses steel alloy ez track. i noticed this set is nickel. can the work together for the same track |
| Answer: | Maybe. I’ve ridden the actual Durango and Silverton and Bachmann has made a very nice model at a very reasonable price. It’s a pleasure to watch. That said, in my particular set the power supply failed after about an hour. When I tried to replace it under warranty I was billed for it. After a couple of phone calls, I straightened everything out, but I remain a bit skeptical of Bachmann quality and of their customer service. I’d say if you want it, go for it, but be prepared to have to work with Bachmann to get it right. |
| Question: | Can I plug the DCC system into my Life-like track |
| Answer: | I'd say no. The transformer information says only that it operates on 120 V. In my experience, power supplies that operate on both 120 and 220 mention both voltages. |
| Question: | Can you buy 2 sets, connect and run them |
| Answer: | Track from different companies are not compatible. The only track you can add to Bachmann is more Bachmann. The only concern I’ve run into is that the track contained in the Durango set is the black trackbed. The grey trackbed seems to be the preferred track and offers more options. |
Product features
Discover Everything Bachmann Trains Offers to Get Started in Model Railroading
Since 1833, Bachmann has been known for providing innovative design at a good value. We are now one of the world's largest distributor, by volume, of ready-to-run train sets, locomotives, track, and accessories. Bachmann is also the only train company to offer products in all five of the most popular scales: N, HO, On30, O, and Large Scale.
As a distributor of beloved Thomas & Friends products, Bachmann brings the adventures of Thomas the Tank Engine to life with a growing line of complete train sets, separate sale items, and accessories for children from 8 to 80-just add your imagination. Thomas & Friends is available in both HO and Large Scale.
Bachmann's exclusive snap-together E-Z Track System makes track setup quick, easy, and fun. Plasticville U.S.A. and SceneScapes buildings and accessories let you add the finishing touches for the perfect layout.
If You Are Purchasing a Train Set, It Will Include
- Locomotive
- Cars (Rolling Stock)
- E-Z Track – available in either black roadbed with steel alloy rail or gray roadbed with nickel silver rail
- Terminal/Rerailer
- Terminal Wire
- Speed Controller
- Power Supply
- List of Components
Track Assembly
- Decide where to set up your train – a dry, firm, flat surface works best!
- To make sure you have enough working room, make a test track layout by loosely placing track in desired configuration.
- The terminal/rerailer section will later be connected to a power pack and power supply, so place it near an outlet or power strip.
- Install under-track magnet, if your set comes with one. If your set does not come with one, magnets are available separately (HO Item No. 78999; N Scale Item No. 78998).
- Assemble the track by pushing together. Make sure the rail and joiners are seated properly. Be careful that the rail joiners do not slip under the rail without properly connecting. This can cause train derailments and electrical circuit interruptions.
- After track is assembled, double-check for joint connection and fit by lightly running your fingers over the top of the rails in both directions.
- If you detect bumps or distortion on the track surface, recheck the rail joiner fit.
Power Connections
- Power supply and speed control are plug and play; no tools are needed.
- Power is supplied to the track and the locomotive by the power supply, speed controller, terminal wire, and E-Z Track terminal/rerailer.
- First – turn knob on the speed controller counterclockwise until it stops (all the way to the left).
- Next – attach terminal wire to the speed controller by plugging it in where it says 'To Track.'
- Then – plug terminal wire into the E-Z Track terminal rerailer. Firmly push connector onto the track terminals.
- Finally – plug the connecting wire from the power supply into jack on the speed controller labeled 'In.' Then plug power supply into a live wall outlet.
- Some sets may come with a speed controller with two push button connectors. These are used to supply AC power to accessories.
- To make positive and secure connections to these, push in buttons and insert each of the bare ends of the connection wire from your accessory.
- The speed controller is capable of powering one accessory at a time.
Putting the Train on the Track
- Put the locomotive on the track and run the wheels back and forth over the terminal rerailer track.
- When the wheels glide smoothly over the track, you know the wheels are all on the track. If your set comes with a tender, attach it to the locomotive.
- Add the rest of the cars that come with your set by placing them on the track and running them back and forth over the terminal rerailer until they glide smoothly. Then gently push the cars together – they will engage automatically.
- Do not try to connect cars when positioned over an under-track magnet.
How to Use E-Z Mate Couplers (HO and On30 Scale)
- Your set may be equipped with E-Z Mate magnetically operated knuckle couplers that let you perform real railroad switching and yard operations.
- Coupling two cars with E-Z Mate couplers is as easy as pushing them together when they are not over an under-track magnet.
- Uncoupling occurs only when over an under-track magnet and when there is no tension between the cars.
- To uncouple E-Z Mate couplers, stop two couplers directly over the under-track magnet. With no tension between the cars, the couplers will open automatically.
- If cars will not couple, check to be sure cars are not positioned over the uncoupling magnet or parked on a curve.
- If cars will not uncouple, check to be sure the couplers are positioned directly adjacent to the magnet position indicator and that the indicator is placed in line with the center line of the under-track magnet.
- Check that the magnet is secured to the underside of the track and fitted with the steel plate provided.
How to Run Your Train
- Turn the knob on the speed controller clockwise until it stops (all the way to the left).
- Plug in the power supply.
- Begin feeding power to the track by slowly turning the knob on the speed controller clockwise.
- Observe the direction of your train.
- If it moves backwards when the controls indicate forward, stop the train.
- Then simply disconnect, flip, and reconnect the terminal wire to the terminal rerailer track.
- Remember – never leave your train running unattended!
Action Checklist (Troubleshooting If Your Train Doesn’t Run or Stops Running)
- Is the power supply plugged in to a live receptacle?
- Are the wheels on the track?
- Is the wiring secure?
- Is the track properly assembled?
- Is the track properly seated in the rail joiner?
- If your train stops or fails to start, a short circuit may be indicated. If this is the case, Unplug The Power Supply Immediately.
- Common reasons for a short circuit: derailed wheels may cause a short. Check to make sure all wheels are on the track. Also check all connections and make sure there is no metal of any sort across the rails.
- After checking everything carefully, resume operation.
- Please note, your power supply is protected by a circuit breaker that automatically resets after a short circuit is corrected.
- Allow up to 5 minutes for the circuit breaker to reset before resuming operation.
Keep Your Train in Top Operating Condition
- Works better after couple hours of break-in time.
- Train performs best under clean operating conditions.
- Clean wheels and a clean track ensure good electrical contact.
- After about every 8 hours of operation, wipe the track rails and exposed wheels with a soft, lint-free cloth.
- Removal of black residue is normal.
- Do Not Use Steel Wool To Clean Your Track.
- Do not use common solvents, they may damage plastics - use track cleaner.
- After 24 hours of use, light lubrication is required to keep train in top operating condition. Bachmann E-Z Lube or other hobby-grade lubricants are recommended.
Bachmann hopes you enjoy your train for many years to come!

Bachmann Trains - Pacific Flyer Ready To Run Electric Train Set - HO Scale
Bachmann Trains
Product description
Pacific Flyer Ready To Run Electric Train Set - HO Scale. Assembly and breakdown of trains in the railway yard is tough work, but this 0-6-0 steam switcher is ready to get the job done. Assemble your consist, clear the yard and move your freight to its final destination with the Pacific Flyer! Watch the video to see the set in action! This ready-to-run train set includes: 0-6-0 steam locomotive and tender with operating headlight, gondola, box car, offset cupola caboose, body-mounted E-Z Mate couplers, 36" circle of snap-fit E-Z Track including 11 pieces of curved track and 1 curved plug-in terminal rerailer, power pack and speed control, illustrated instruction manual
From the Manufacturer
Assembly and breakdown of trains in the railway yard is tough work, but this 0-6-0 steam switcher is ready to get the job done. Assemble your consist, clear the yard and move your freight to its final destination with the Pacific Flyer.
- Complete Ready To Run Freight Train Set
- Powered by a 0-6-0 Steam Era Locomotive and Tender with Operating Headlight
- Includes; Gondola Car, Box Car, and Off-Set Cupola Caboose
- 36" Circle of Snap-Fit E-Z Track, Power Pack and Speed Controller
- HO Scale 1:87
User questions & answers
| Question: | Is the Height 3 inches |
| Answer: | Hi there, The Adventure Town Railway train set is compatible with KidKraft, Brio® and Thomas & Friends Wooden Railway vehicles and play sets. Thank you for playing with KIdKraft!- The KidKraft Customer Care Team |
| Question: | does it have smoke |
| Answer: | If you contact the seller they might be able to assist you with any broken parts or pieces missing, that's generally what I do. |
| Question: | why does my train slow down when it gets to a certain point on the track |
| Answer: | Hi There, The bins on the Adventure Railway Train Set & Table do slide under on wooden rails designed to hold them. Thank you for Playing with KidKraft! The Kidkraft Customer Care Team |
| Question: | Does the train whistle |
| Answer: | I don't know for sure, but I think duplo are the same size and pattern as lego blocks. I bought the table for my grand-niece so I haven't actually seen it yet. Your answer might be to compare the specifications for legos and duplos at their manufacturers' sites. Sorry I can't be of more assistance, I had American Bricks and Lincoln Logs when I was a kid! |
Product features
Discover Everything Bachmann Trains Offers to Get Started in Model Railroading
Since 1833, Bachmann has been known for providing innovative design at a good value. We are now one of the world's largest distributor, by volume, of ready-to-run train sets, locomotives, track, and accessories. Bachmann is also the only train company to offer products in all five of the most popular scales: N, HO, On30, O, and Large Scale.
As a distributor of beloved Thomas & Friends products, Bachmann brings the adventures of Thomas the Tank Engine to life with a growing line of complete train sets, separate sale items, and accessories for children from 8 to 80-just add your imagination. Thomas & Friends is available in both HO and Large Scale.
Bachmann's exclusive snap-together E-Z Track System makes track setup quick, easy, and fun. Plasticville U.S.A. and SceneScapes buildings and accessories let you add the finishing touches for the perfect layout.
If You Are Purchasing a Train Set, It Will Include
- Locomotive
- Cars (Rolling Stock)
- E-Z Track – available in either black roadbed with steel alloy rail or gray roadbed with nickel silver rail
- Terminal/Rerailer
- Terminal Wire
- Speed Controller
- Power Supply
- List of Components
Track Assembly
- Decide where to set up your train – a dry, firm, flat surface works best!
- To make sure you have enough working room, make a test track layout by loosely placing track in desired configuration.
- The terminal/rerailer section will later be connected to a power pack and power supply, so place it near an outlet or power strip.
- Install under-track magnet, if your set comes with one. If your set does not come with one, magnets are available separately (HO Item No. 78999; N Scale Item No. 78998).
- Assemble the track by pushing together. Make sure the rail and joiners are seated properly. Be careful that the rail joiners do not slip under the rail without properly connecting. This can cause train derailments and electrical circuit interruptions.
- After track is assembled, double-check for joint connection and fit by lightly running your fingers over the top of the rails in both directions.
- If you detect bumps or distortion on the track surface, recheck the rail joiner fit.
Power Connections
- Power supply and speed control are plug and play; no tools are needed.
- Power is supplied to the track and the locomotive by the power supply, speed controller, terminal wire, and E-Z Track terminal/rerailer.
- First – turn knob on the speed controller counterclockwise until it stops (all the way to the left).
- Next – attach terminal wire to the speed controller by plugging it in where it says 'To Track.'
- Then – plug terminal wire into the E-Z Track terminal rerailer. Firmly push connector onto the track terminals.
- Finally – plug the connecting wire from the power supply into jack on the speed controller labeled 'In.' Then plug power supply into a live wall outlet.
- Some sets may come with a speed controller with two push button connectors. These are used to supply AC power to accessories.
- To make positive and secure connections to these, push in buttons and insert each of the bare ends of the connection wire from your accessory.
- The speed controller is capable of powering one accessory at a time.
Putting the Train on the Track
- Put the locomotive on the track and run the wheels back and forth over the terminal rerailer track.
- When the wheels glide smoothly over the track, you know the wheels are all on the track. If your set comes with a tender, attach it to the locomotive.
- Add the rest of the cars that come with your set by placing them on the track and running them back and forth over the terminal rerailer until they glide smoothly. Then gently push the cars together – they will engage automatically.
- Do not try to connect cars when positioned over an under-track magnet.
How to Use E-Z Mate Couplers (HO and On30 Scale)
- Your set may be equipped with E-Z Mate magnetically operated knuckle couplers that let you perform real railroad switching and yard operations.
- Coupling two cars with E-Z Mate couplers is as easy as pushing them together when they are not over an under-track magnet.
- Uncoupling occurs only when over an under-track magnet and when there is no tension between the cars.
- To uncouple E-Z Mate couplers, stop two couplers directly over the under-track magnet. With no tension between the cars, the couplers will open automatically.
- If cars will not couple, check to be sure cars are not positioned over the uncoupling magnet or parked on a curve.
- If cars will not uncouple, check to be sure the couplers are positioned directly adjacent to the magnet position indicator and that the indicator is placed in line with the center line of the under-track magnet.
- Check that the magnet is secured to the underside of the track and fitted with the steel plate provided.
How to Run Your Train
- Turn the knob on the speed controller clockwise until it stops (all the way to the left).
- Plug in the power supply.
- Begin feeding power to the track by slowly turning the knob on the speed controller clockwise.
- Observe the direction of your train.
- If it moves backwards when the controls indicate forward, stop the train.
- Then simply disconnect, flip, and reconnect the terminal wire to the terminal rerailer track.
- Remember – never leave your train running unattended!
Action Checklist (Troubleshooting If Your Train Doesn’t Run or Stops Running)
- Is the power supply plugged in to a live receptacle?
- Are the wheels on the track?
- Is the wiring secure?
- Is the track properly assembled?
- Is the track properly seated in the rail joiner?
- If your train stops or fails to start, a short circuit may be indicated. If this is the case, Unplug The Power Supply Immediately.
- Common reasons for a short circuit: derailed wheels may cause a short. Check to make sure all wheels are on the track. Also check all connections and make sure there is no metal of any sort across the rails.
- After checking everything carefully, resume operation.
- Please note, your power supply is protected by a circuit breaker that automatically resets after a short circuit is corrected.
- Allow up to 5 minutes for the circuit breaker to reset before resuming operation.
Keep Your Train in Top Operating Condition
- Works better after couple hours of break-in time.
- Train performs best under clean operating conditions.
- Clean wheels and a clean track ensure good electrical contact.
- After about every 8 hours of operation, wipe the track rails and exposed wheels with a soft, lint-free cloth.
- Removal of black residue is normal.
- Do Not Use Steel Wool To Clean Your Track.
- Do not use common solvents, they may damage plastics - use track cleaner.
- After 24 hours of use, light lubrication is required to keep train in top operating condition. Bachmann E-Z Lube or other hobby-grade lubricants are recommended.
Bachmann hopes you enjoy your train for many years to come!

Bachmann Trains - Echo Valley Express DCC Sound Value Ready To Run Electric Train Set - HO Scale
Bachmann Trains
Product description
Bachmann Trains ECHO VALLEY EXPRESS - HO Scale Ready to Run Electric Train Set With Sound Value Equipped Locomotive - HO Scale. A whistle echoes through the walls of a deep valley as you hear the unmistakable chuffing of a classic steam locomotive approaching. The Echo Valley Express is steaming ahead with carloads of coal to fuel America's hungry furnaces. It features a DCC sound-equipped Baldwin 2-6-0 with a steam sound package that includes authentic prototypical chuff, short and long whistles, bell, air compressor, and blower-all in polyphonic 16-bit sound that you can control with our E-Z Command digital control system. This digitally controlled train set with sound features: DCC sound-equipped 2-6-0 steam locomotive with tender and operating headlight, gondola car, quad hopper car, off-center caboose, E-Z Command Control Center with wall pack and speed controller, body-mounted E-Z Mate couplers, 56" x 38" oval of snap-fit nickel silver E-Z Track including 12 pieces of curved track, 3 pieces of straight track, and 1 plug-in terminal rerailer, illustrated instruction manual.
- Complete Ready To Run Train Set with DCC Sound Locomotive
- Powered by a DCC Sound-Equipped Alco 2-6-0 Steam Era Locomotive with Tender and Operating Headlight
- Includes; Gondola Car, Quad Hopper Car and Off-Set Cupola Caboose
- 56" x 38" Oval of Nickel Silver E-Z Track, Power Pack and E-Z Command Controller
- HO Scale 1:87
- DCC-Equipped for Speed, Direction Lighting, and Sound
User questions & answers
| Question: | What switches work with this set |
| Answer: | Nope. It’s barely padded. I had different lining at the bottom of the bag but not truly “padded” to me. |
| Question: | Can i use lionel liquid smoke with this |
| Answer: | We would recommend going up to the next size bag. It would be very tight and depending on the board may not fit. |
| Question: | What is DCC |
| Answer: | It would hold a pair of ski poles and skis, the length of the bag depends on if you choose 157 or 165, it can fit skis within that size range |
| Question: | Train won't run with controller that can with set. Only makes noice. Is there something you need to do to train to start it |
| Answer: | The bag is just a carry bag; it has no padding. But you could wrap clothes around the nose and tail of the board to protect it if you want to take it on a plane. I will be taking mine on a plane and that is what I plan to do. |
Product features
Discover Everything Bachmann Trains Offers to Get Started in Model Railroading
Since 1833, Bachmann has been known for providing innovative design at a good value. We are now one of the world's largest distributor, by volume, of ready-to-run train sets, locomotives, track, and accessories. Bachmann is also the only train company to offer products in all five of the most popular scales: N, HO, On30, O, and Large Scale.
As a distributor of beloved Thomas & Friends products, Bachmann brings the adventures of Thomas the Tank Engine to life with a growing line of complete train sets, separate sale items, and accessories for children from 8 to 80-just add your imagination. Thomas & Friends is available in both HO and Large Scale.
Bachmann's exclusive snap-together E-Z Track System makes track setup quick, easy, and fun. Plasticville U.S.A. and SceneScapes buildings and accessories let you add the finishing touches for the perfect layout.
If You Are Purchasing a Train Set, It Will Include
- Locomotive
- Cars (Rolling Stock)
- E-Z Track – available in either black roadbed with steel alloy rail or gray roadbed with nickel silver rail
- Terminal/Rerailer
- Terminal Wire
- Speed Controller
- Power Supply
- List of Components
Track Assembly
- Decide where to set up your train – a dry, firm, flat surface works best!
- To make sure you have enough working room, make a test track layout by loosely placing track in desired configuration.
- The terminal/rerailer section will later be connected to a power pack and power supply, so place it near an outlet or power strip.
- Install under-track magnet, if your set comes with one. If your set does not come with one, magnets are available separately (HO Item No. 78999; N Scale Item No. 78998).
- Assemble the track by pushing together. Make sure the rail and joiners are seated properly. Be careful that the rail joiners do not slip under the rail without properly connecting. This can cause train derailments and electrical circuit interruptions.
- After track is assembled, double-check for joint connection and fit by lightly running your fingers over the top of the rails in both directions.
- If you detect bumps or distortion on the track surface, recheck the rail joiner fit.
Power Connections
- Power supply and speed control are plug and play; no tools are needed.
- Power is supplied to the track and the locomotive by the power supply, speed controller, terminal wire, and E-Z Track terminal/rerailer.
- First – turn knob on the speed controller counterclockwise until it stops (all the way to the left).
- Next – attach terminal wire to the speed controller by plugging it in where it says 'To Track.'
- Then – plug terminal wire into the E-Z Track terminal rerailer. Firmly push connector onto the track terminals.
- Finally – plug the connecting wire from the power supply into jack on the speed controller labeled 'In.' Then plug power supply into a live wall outlet.
- Some sets may come with a speed controller with two push button connectors. These are used to supply AC power to accessories.
- To make positive and secure connections to these, push in buttons and insert each of the bare ends of the connection wire from your accessory.
- The speed controller is capable of powering one accessory at a time.
Putting the Train on the Track
- Put the locomotive on the track and run the wheels back and forth over the terminal rerailer track.
- When the wheels glide smoothly over the track, you know the wheels are all on the track. If your set comes with a tender, attach it to the locomotive.
- Add the rest of the cars that come with your set by placing them on the track and running them back and forth over the terminal rerailer until they glide smoothly. Then gently push the cars together – they will engage automatically.
- Do not try to connect cars when positioned over an under-track magnet.
How to Use E-Z Mate Couplers (HO and On30 Scale)
- Your set may be equipped with E-Z Mate magnetically operated knuckle couplers that let you perform real railroad switching and yard operations.
- Coupling two cars with E-Z Mate couplers is as easy as pushing them together when they are not over an under-track magnet.
- Uncoupling occurs only when over an under-track magnet and when there is no tension between the cars.
- To uncouple E-Z Mate couplers, stop two couplers directly over the under-track magnet. With no tension between the cars, the couplers will open automatically.
- If cars will not couple, check to be sure cars are not positioned over the uncoupling magnet or parked on a curve.
- If cars will not uncouple, check to be sure the couplers are positioned directly adjacent to the magnet position indicator and that the indicator is placed in line with the center line of the under-track magnet.
- Check that the magnet is secured to the underside of the track and fitted with the steel plate provided.
How to Run Your Train
- Turn the knob on the speed controller clockwise until it stops (all the way to the left).
- Plug in the power supply.
- Begin feeding power to the track by slowly turning the knob on the speed controller clockwise.
- Observe the direction of your train.
- If it moves backwards when the controls indicate forward, stop the train.
- Then simply disconnect, flip, and reconnect the terminal wire to the terminal rerailer track.
- Remember – never leave your train running unattended!
Action Checklist (Troubleshooting If Your Train Doesn’t Run or Stops Running)
- Is the power supply plugged in to a live receptacle?
- Are the wheels on the track?
- Is the wiring secure?
- Is the track properly assembled?
- Is the track properly seated in the rail joiner?
- If your train stops or fails to start, a short circuit may be indicated. If this is the case, Unplug The Power Supply Immediately.
- Common reasons for a short circuit: derailed wheels may cause a short. Check to make sure all wheels are on the track. Also check all connections and make sure there is no metal of any sort across the rails.
- After checking everything carefully, resume operation.
- Please note, your power supply is protected by a circuit breaker that automatically resets after a short circuit is corrected.
- Allow up to 5 minutes for the circuit breaker to reset before resuming operation.
Keep Your Train in Top Operating Condition
- Works better after couple hours of break-in time.
- Train performs best under clean operating conditions.
- Clean wheels and a clean track ensure good electrical contact.
- After about every 8 hours of operation, wipe the track rails and exposed wheels with a soft, lint-free cloth.
- Removal of black residue is normal.
- Do Not Use Steel Wool To Clean Your Track.
- Do not use common solvents, they may damage plastics - use track cleaner.
- After 24 hours of use, light lubrication is required to keep train in top operating condition. Bachmann E-Z Lube or other hobby-grade lubricants are recommended.
Bachmann hopes you enjoy your train for many years to come!

Bachmann Trains - Thunder Valley Ready To Run Electric Train Set - N Scale
Bachmann Trains
Product description
Thunder Valley Ready To Run Electric Train Set - N Scale. The rails rumble and the engine roars as the mighty Thunder Valley rounds the bend, hauling freight to destinations far and wide. This train set comes complete with Bachmann‘s exclusive E-Z Track snap-fit track and roadbed systems. The set includes; an EMD GP40 diesel locomotive with operating headlight, steel reefer, three-dome tank car, wide-vision caboose, 24" circle of nickel silver E-Z Track including 11 pieces curved track and 1 plug-in terminal rerailer, power pack and speed controller, illustrated instruction manual.
From the Manufacturer
The rails rumble and the engine roars as the mighty Thunder Valley rounds the bend, hauling freight to destinations far and wide. The Thunder Valley N Scale Ready To Run Electric Train Set is recommended for modelers ages 14 and up. This train set comes complete with Bachmann‘s exclusive E-Z Track snap-fit track and roadbed systems, plus: an EMD GP40 diesel locomotive with operating headlight, steel reefer, three-dome tank car, wide-vision caboose, 24" circle of nickel silver E-Z Track, power pack and speed controller, illustrated instruction manual. N Scale trains are designed to fit in small spaces (the size ratio is 1:160) the track must be placed on a flat surface for best performance. The advantages of N Scale trains are very small size allows more elaborate layouts, moderate cost, good detail, good support and availability of trains, and a nice variety. The disadvantages of N Scale Trains are; care must be taken as the product can be fragile, the small size can be hard to see, the cars can be hard to rerail. This product is recommended for modelers ages 14 and up.
- Complete Ready To Run Freight Train Set
- Powered by a EMD GP40 Diesel Locomotive with Operating Headlight
- Includes; Steel Reefer Car, Three-Dome Tank Car, and Wide-Vision Caboose
- 24" Circle of Nickel Silver E-Z Track , Power Pack and Speed Controller
- N Scale 1:160
- Recommended For Ages 14 & Up
User questions & answers
| Question: | Will the power supply work with a HO train set |
| Answer: | Yes. But this set doesn't have the connections to power accessories. I bought a track switch and realized too late that I can't power it. Other sets by Bachman can. It works great for powering the train though, and it will power HO or N scale tracks. |
| Question: | Is this ho track |
| Answer: | The website says it should have track pieces. |
| Question: | What country is the power adapter for |
| Answer: | the United States of America. |
| Question: | Seriously ??!! Only 24" of track |
| Answer: | Just builds you a circular track. That's it. |
Product features
Discover Everything Bachmann Trains Offers to Get Started in Model Railroading
Since 1833, Bachmann has been known for providing innovative design at a good value. We are now one of the world's largest distributor, by volume, of ready-to-run train sets, locomotives, track, and accessories. Bachmann is also the only train company to offer products in all five of the most popular scales: N, HO, On30, O, and Large Scale.
As a distributor of beloved Thomas & Friends products, Bachmann brings the adventures of Thomas the Tank Engine to life with a growing line of complete train sets, separate sale items, and accessories for children from 8 to 80-just add your imagination. Thomas & Friends is available in both HO and Large Scale.
Bachmann's exclusive snap-together E-Z Track System makes track setup quick, easy, and fun. Plasticville U.S.A. and SceneScapes buildings and accessories let you add the finishing touches for the perfect layout.
If You Are Purchasing a Train Set, It Will Include
- Locomotive
- Cars (Rolling Stock)
- E-Z Track – available in either black roadbed with steel alloy rail or gray roadbed with nickel silver rail
- Terminal/Rerailer
- Terminal Wire
- Speed Controller
- Power Supply
- List of Components
Track Assembly
- Decide where to set up your train – a dry, firm, flat surface works best!
- To make sure you have enough working room, make a test track layout by loosely placing track in desired configuration.
- The terminal/rerailer section will later be connected to a power pack and power supply, so place it near an outlet or power strip.
- Install under-track magnet, if your set comes with one. If your set does not come with one, magnets are available separately (HO Item No. 78999; N Scale Item No. 78998).
- Assemble the track by pushing together. Make sure the rail and joiners are seated properly. Be careful that the rail joiners do not slip under the rail without properly connecting. This can cause train derailments and electrical circuit interruptions.
- After track is assembled, double-check for joint connection and fit by lightly running your fingers over the top of the rails in both directions.
- If you detect bumps or distortion on the track surface, recheck the rail joiner fit.
Power Connections
- Power supply and speed control are plug and play; no tools are needed.
- Power is supplied to the track and the locomotive by the power supply, speed controller, terminal wire, and E-Z Track terminal/rerailer.
- First – turn knob on the speed controller counterclockwise until it stops (all the way to the left).
- Next – attach terminal wire to the speed controller by plugging it in where it says 'To Track.'
- Then – plug terminal wire into the E-Z Track terminal rerailer. Firmly push connector onto the track terminals.
- Finally – plug the connecting wire from the power supply into jack on the speed controller labeled 'In.' Then plug power supply into a live wall outlet.
- Some sets may come with a speed controller with two push button connectors. These are used to supply AC power to accessories.
- To make positive and secure connections to these, push in buttons and insert each of the bare ends of the connection wire from your accessory.
- The speed controller is capable of powering one accessory at a time.
Putting the Train on the Track
- Put the locomotive on the track and run the wheels back and forth over the terminal rerailer track.
- When the wheels glide smoothly over the track, you know the wheels are all on the track. If your set comes with a tender, attach it to the locomotive.
- Add the rest of the cars that come with your set by placing them on the track and running them back and forth over the terminal rerailer until they glide smoothly. Then gently push the cars together – they will engage automatically.
- Do not try to connect cars when positioned over an under-track magnet.
How to Use E-Z Mate Couplers (HO and On30 Scale)
- Your set may be equipped with E-Z Mate magnetically operated knuckle couplers that let you perform real railroad switching and yard operations.
- Coupling two cars with E-Z Mate couplers is as easy as pushing them together when they are not over an under-track magnet.
- Uncoupling occurs only when over an under-track magnet and when there is no tension between the cars.
- To uncouple E-Z Mate couplers, stop two couplers directly over the under-track magnet. With no tension between the cars, the couplers will open automatically.
- If cars will not couple, check to be sure cars are not positioned over the uncoupling magnet or parked on a curve.
- If cars will not uncouple, check to be sure the couplers are positioned directly adjacent to the magnet position indicator and that the indicator is placed in line with the center line of the under-track magnet.
- Check that the magnet is secured to the underside of the track and fitted with the steel plate provided.
How to Run Your Train
- Turn the knob on the speed controller clockwise until it stops (all the way to the left).
- Plug in the power supply.
- Begin feeding power to the track by slowly turning the knob on the speed controller clockwise.
- Observe the direction of your train.
- If it moves backwards when the controls indicate forward, stop the train.
- Then simply disconnect, flip, and reconnect the terminal wire to the terminal rerailer track.
- Remember – never leave your train running unattended!
Action Checklist (Troubleshooting If Your Train Doesn’t Run or Stops Running)
- Is the power supply plugged in to a live receptacle?
- Are the wheels on the track?
- Is the wiring secure?
- Is the track properly assembled?
- Is the track properly seated in the rail joiner?
- If your train stops or fails to start, a short circuit may be indicated. If this is the case, Unplug The Power Supply Immediately.
- Common reasons for a short circuit: derailed wheels may cause a short. Check to make sure all wheels are on the track. Also check all connections and make sure there is no metal of any sort across the rails.
- After checking everything carefully, resume operation.
- Please note, your power supply is protected by a circuit breaker that automatically resets after a short circuit is corrected.
- Allow up to 5 minutes for the circuit breaker to reset before resuming operation.
Keep Your Train in Top Operating Condition
- Works better after couple hours of break-in time.
- Train performs best under clean operating conditions.
- Clean wheels and a clean track ensure good electrical contact.
- After about every 8 hours of operation, wipe the track rails and exposed wheels with a soft, lint-free cloth.
- Removal of black residue is normal.
- Do Not Use Steel Wool To Clean Your Track.
- Do not use common solvents, they may damage plastics - use track cleaner.
- After 24 hours of use, light lubrication is required to keep train in top operating condition. Bachmann E-Z Lube or other hobby-grade lubricants are recommended.
Bachmann hopes you enjoy your train for many years to come!
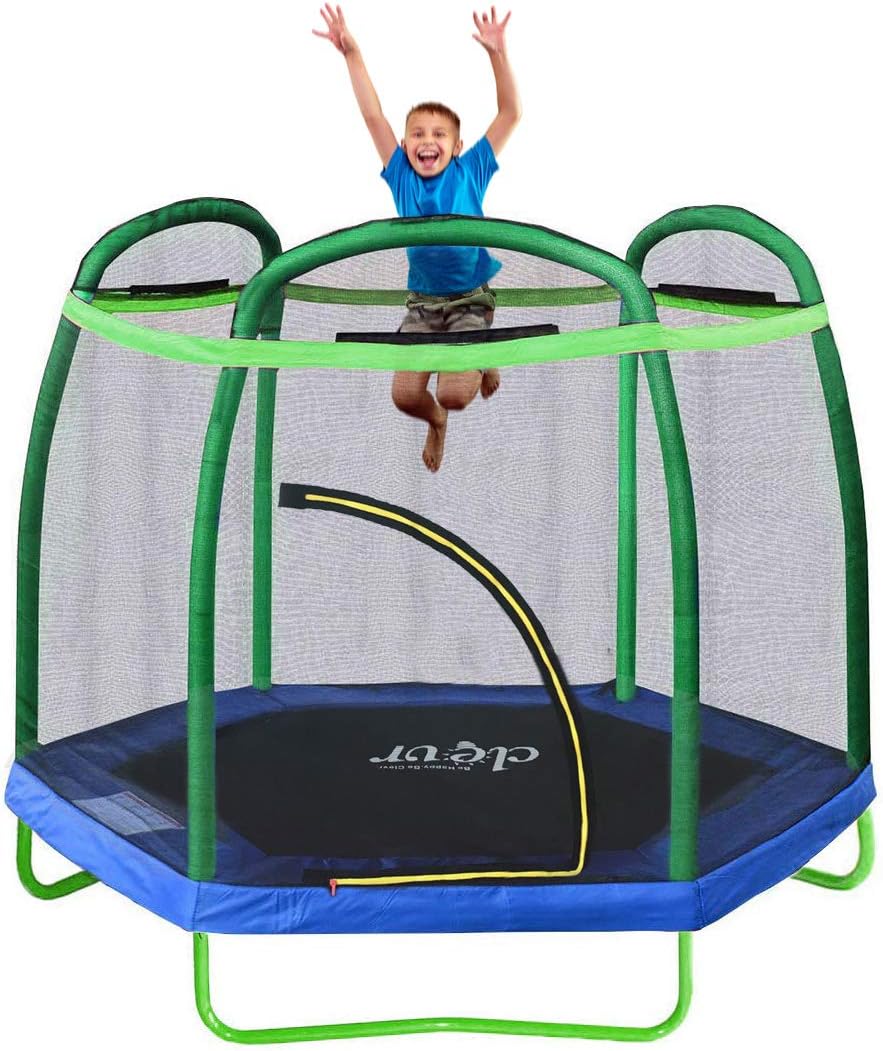
Clevr 7ft Kids Trampoline with Safety Enclosure Net & Spring Pad, Mini Indoor/Outdoor Round Bounce Jumper 84", Built-in Zipper Heavy Duty Steel Frame, Great Gift for Kids
Clevr
- Safe Playtime | The trampoline is built with durable water-proof protective padding to prevent your kids from falling and getting injured while jumping or playing in it. The Pad is filled with thick foam reinforced for maximum impact protection.
- Heavy Duty | The trampoline is manufactured with heavy duty powder-coated steel frame and base for a stable and durable platform. The base is designed to provide extra stability and strength, preventing trampoline from tipping over! The Heavy-Duty Galvanized Springs are built to withstand long lasting play!
- Features | The trampoline features EPE foam protective padding around the poles which delivers the highest level of safety for all kids! High-Quality elastic PE Net with a strong Zipper surrounds the entire jumping area helps keep children secure at all time.
- Easy Setup | With this trampoline’s simple setup, it can be put together within hours! We also provide customer service by email if there are any issues with assembly!
- This 7 ft trampoline provides ample space for playing and year-round family fun, making it a perfect gift for your little one. Recommended for children between 3-10 years old. Weight capacity: 150 lbs.
User questions & answers
| Question: | Anyone who`s bought this for outdoor use in Colorado, is it holding up ok during winter |
| Answer: | It holds up just fine during winter, but it is recommended to keep inside on very heavy snow days! :) |
| Question: | How does this hold up in the south in the hot sun. i live in nc |
| Answer: | Yes. I leave it out year around. I live in Ohio and we leave it out in the hot sun and cold winter! It is very nice. |
| Question: | We ordered this trampoline in November 2018 and three of the fabric pieces that hold the springs came undone already. Is there a warrenty |
| Answer: | I believe there was a warranty in the box, ours is almost 2 years old and looks brand new , never had any issues. |
| Question: | How big is the box it comes in? Can i transport in a medium sized sedan |
| Answer: | Hello, thank you for your email, the measurements of the box are as follows 46x21x10 |
Product features
Fun for The Whole Family
With safety and durability as top priority, Clevr 7ft Kids Trampoline provides ample jumping space for your little one, encouraging family togetherness and childhood independence all year round. This trampoline provides children with fun exercise while also helping to develop strong balance and coordination, as well as strength and stamina.
The trampoline is built with durable water-proof protective padding to prevent your kids from falling and getting injured while jumping or playing in it. The Pad is filled with thick foam reinforced for maximum impact protection. This trusted product provides fun for the whole family, making it a perfect gift for your child.
- Diameter (Width): approx. 84"
- Trampoline Height: approx. 16.5"
- Height of Net: approx. 63"
- Total Height with Safety Net: 79"
- Weight Capacity: 150 Lbs
- Materials: PVC / Mesh / Steel / Foam
- Recommended for Children over 3 years old.
Note: Colors might appear slightly different that the picture due to different monitor settings.
Upgraded Arched Zipper Door
Unlike the traditional L-Shaped Zipper, which is inconveniently designed and rips easily, the upgraded arched zipper door is designed to prevent kids from tripping when getting in and out of the trampoline and provide maximum security.
Protective Foam Padding
Durable Water-Proof Pad Filled With Thick Foam, Reinforced for maximum Impact Protection
Enclosure Door
High-quality PE Net with strong Zipper surrounds the entire jumping area for added safety
Galvanized Springs
Jumping Mat is attached to the frame by heavy-duty galvanized springs, which are built to withstand long lasting play!
Stable Support
The trampoline is manufactured with heavy duty powder-coated steel frame and base for a stable and durable platform. The base is designed to provide extra stability and strength, preventing trampoline from tipping over!
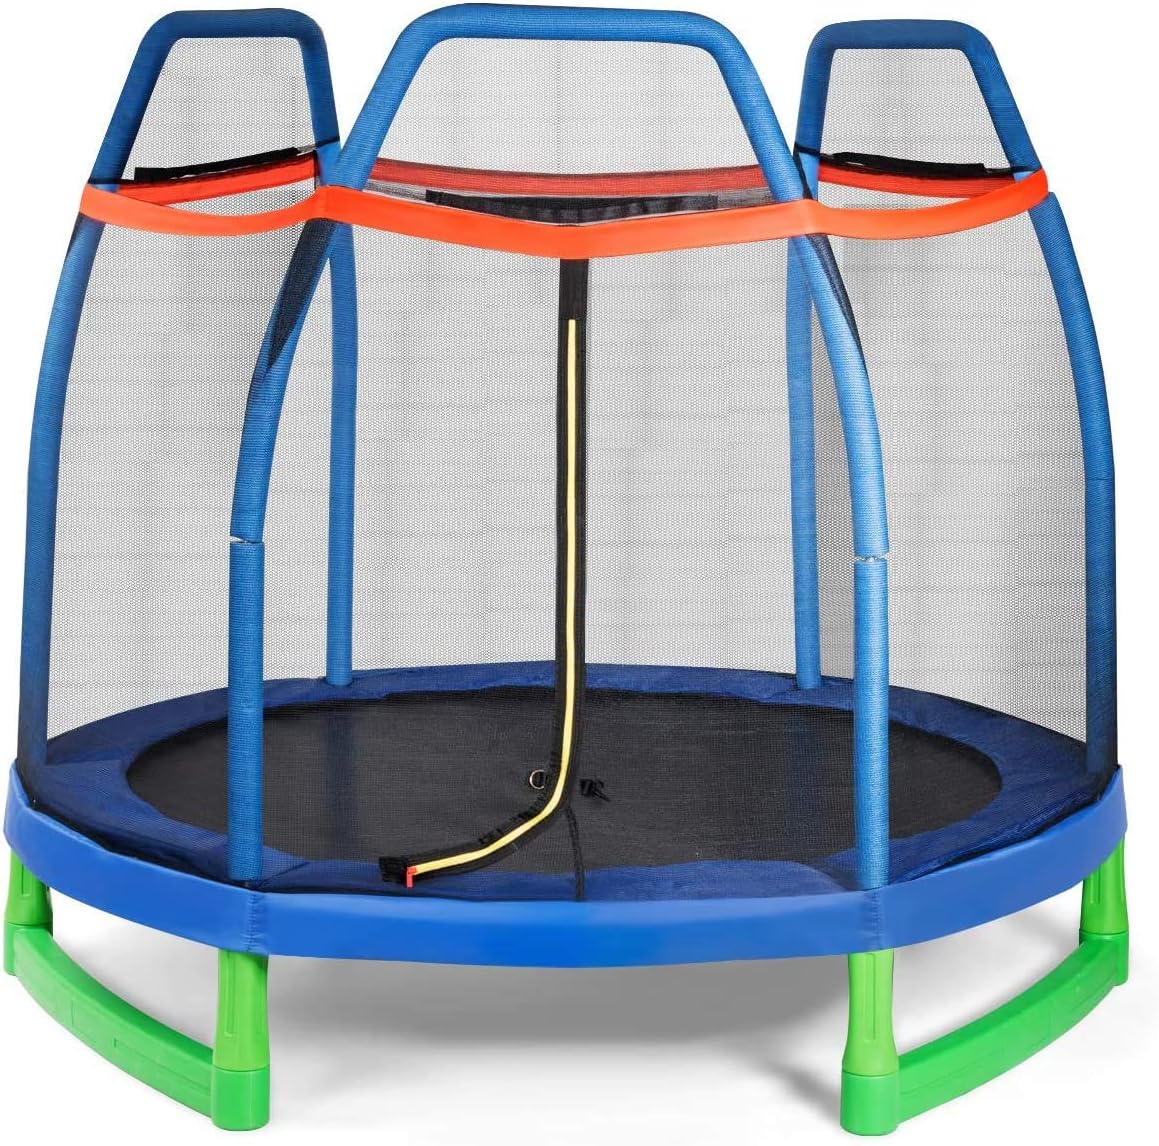
Giantex 7 Ft Kids Trampoline w/Safety Enclosure Net, Spring Pad, Zipper, Heavy Duty Steel Frame, Mini Trampoline for Indoor/Outdoor, Supports up to 220 Pounds, Great Gifts for Kids
Giantex
- 🎅 Safe Enclosed Trampoline: Seamless design between the enclosure net and the mat allows that your kids will not get stuck in the gap. And EPE foam protective sleeve prevents your kids from unexpected knock while jumping freely. And the large round jumping mat with 83” diameter provides an exciting activity center for kids.
- 🎅 Excellent Bounce Performance: The kids trampoline attached rust-resistant and thick spring features the premium elasticity and non-deformation, promising the long-time use. And the jumping mat of the trampoline is made of PP material with premium elasticity-back property allows kids to jump higher, happier.
- 🎅 Heavy Duty Construction: Constructed of galvanized steel frame with reinforced triangular base, this 7 FT kids trampoline can hold up to 220lbs and effectively prevent slipping while slam jumping. L-shaped zipper with a hook-and-loop breakaway rim minimizes damage to enclosure net and poles and is convenient to enter.
- 🎅 Break the Rules of Gravity: 360 degree enclosure protection net comprehensively safeguard your kids and isolate from the danger zone. Frequent jumping will revitalize your growth plate to promote children's bone growth and enhance the effects of constitution.
- 🎅 Year-round Family Fun Time: This small trampoline will be eye-catching addition to your backyard and served as the outdoor activity center for your weekly family fun time, assuring the roaring laughter for your kids and friends every day. Perfect gift for kids.
User questions & answers
| Question: | where can i find a manual to show how to take apart this trampoline |
| Answer: | There are only the supports visible in the picture; no diagonal bars. |
| Question: | what is meant by the statement,"can hold up to 275 lbs |
| Answer: | If the tumbler has a smaller bottom it will hold it. It looks designed for cans. |
| Question: | How hard is it to take the net off if you wanted to move it from inside to outside |
| Answer: | 16" from floor to expanded seat |
| Question: | Our yard has a bit of a slope, are you able to adjust the legs to level this on uneven ground |
| Answer: | One of the many stickers stitched to the chair states the maximum weight is 225 lbs. |
Latest Reviews
View all
Nike Sports Backpacks
- Updated: 22.04.2023
- Read reviews

Rearview Cameras
- Updated: 19.05.2023
- Read reviews
Ergonomic Chairs With Headrests
- Updated: 02.01.2023
- Read reviews

Philips Indoor Plants
- Updated: 27.04.2023
- Read reviews
Nuk Baby Sippy Cups
- Updated: 10.05.2023
- Read reviews