6 best pool paints
Pool paints are specialized coatings used for the interior and exterior surfaces of swimming pools. They are related to pool deck repair products, parts, accessories, and fall under the category of supplies for pools, hot tubs, and outdoor spaces. Here's what you need to know about pool paints:
Types:
Epoxy Pool Paint: Epoxy-based pool paints are known for their durability and resistance to chemicals, UV rays, and abrasion. They provide a long-lasting finish but may require careful surface preparation.
Chlorinated Rubber Pool Paint: This type of paint is known for its excellent adhesion and flexibility. It's resistant to pool chemicals and can be used on various pool surfaces.
Acrylic Pool Paint: Acrylic paints are popular for their ease of use and fast drying time. They are suitable for both indoor and outdoor pools and offer good resistance to UV rays and chemicals.
Application:
Surface Preparation: Proper preparation of the pool surface is crucial for a successful paint job.This may involve cleaning, repairing cracks or imperfections, and ensuring the surface is free from debris and contaminants.
Priming (if necessary): Depending on the type of paint and the condition of the pool surface, a primer may be recommended to ensure proper adhesion.
Application Technique: Pool paints can be applied using brushes, rollers, or spray equipment. It's important to follow the manufacturer's guidelines for application, including recommended temperatures and drying times.
Number of Coats: Most pool paints require multiple coats to achieve the desired finish and durability. Allow each coat to dry thoroughly before applying the next.
Drying Time and Curing: The drying time and curing process can vary depending on the type of paint and environmental conditions. It's important to follow the manufacturer's instructions for proper drying and curing times.
Color Options: Pool paints are available in a range of colors, allowing pool owners to choose a finish that complements their outdoor space.
Maintenance and Longevity: Proper maintenance, including regular cleaning and water chemistry management, can help extend the life of the pool paint. Over time, it may be necessary to recoat the pool surface to maintain its appearance and protection.
Compatibility: It's important to choose a pool paint that is compatible with the existing surface material of your pool (e.g., concrete, plaster, fiberglass). Some paints are designed specifically for certain types of pool surfaces.
Safety and Environmental Considerations: Be sure to follow safety precautions recommended by the manufacturer, including proper ventilation and protective equipment during application.
Legal and Regulatory Compliance: Some areas may have specific regulations regarding the use of certain types of pool paints. It's important to be aware of any local requirements.
Always consult with the manufacturer or a professional for specific guidance on choosing, applying, and maintaining pool paints for your particular pool surface.
Below you can find our editor's choice of the best pool paints on the market
INSL-X WR102409A-01 Waterborne Semi-Gloss Pool Paint, 1 Gallon, Royal Blue
INSL-X
Product description
Waterborne Swimming Pool Paint is a low-VOC coating that dries quickly for recoating, and withstands continuous submersion in fresh or salt water. Use Waterborne Swimming Pool Paint over most types of properly prepared existing pool paints, as well as bare concrete or plaster, marcite, gunite, and other masonry surfaces in sound condition.
- Royal Blue Waterborne Acrylic emulsion swimming pool paint.
- Use with fresh or saltwater swimming pools.
- Quick-drying acrylic swimming pool paint.
- Lasting color and protection in black, white, aquamarine, royal blue, and ocean blue pool paint.
- Can be applied over most types of properly prepared existing pool paints.
- Ideal for bare concrete, marcite, gunite & pools made of other masonry.
- Before painting, review the INSL-X Waterborne Pool Painting Guide for proper preparation and application tips.
User questions & answers
| Question: | What is the ideal temperature to apply the paint |
| Answer: | Hello, apply when material, air and surface temperatures are between 50 °F and 90 °F (10 °C to 32.2 °C) ideally 77°F, 25°C @50% RH • Always apply two (2) coats of paint at the recommended spread rate • Avoid painting in direct sunlight or when rain is forecast within 3 days. Do not paint if surface temperature is within 5 degrees of the dew point. |
| Question: | Can I use this paint in my above ground vinyl pool |
| Answer: | Hello, this paint should not be applied to vinyl. |
| Question: | Can these colors be mixed? Was wanting to soften the Ocean Blue by blending it 50-50 with the white, to make it a more powdery blue |
| Answer: | Yes, you can certainly mix these colors together to come up with something new. It would be best to mix these in the largest container you can find such as a 5 gallon pail or larger. This ensures color uniformity throughout the pool by not having to mix additional kits which may end up having slight variances. |
| Question: | How long after painting must one wait before filling the pool |
| Answer: | I live in an area where a hot day is about 70-75 degrees . After painting my pond, (2 coats) I waited 7 days before putting water in it. NO PROBLEMS.. |

In The Swim Super Poxy Shield Epoxy-Base Swimming Pool Paint - Pool Blue 1 Gallon
In The Swim
- Ideal for use on Plaster, Gunite, Concrete, and Fiberglass gel-coat surfaces
- A single application can last up to 7 - 8 years
- Delivers a stain-resistant, tile like finish
- Please Note: Epoxy Primer is required for new applications
- Coverage: 125 - 150 sq ft per gallon on average
User questions & answers
| Question: | My pool has several coats of epoxy paint already. Can I apply this paint directly or do I need to prime the surface first |
| Answer: | I sanded all suspicious areas then painted. It’ s been a year with no problems whatsoever |
| Question: | Do i mix in sand with to the Primer or Paint for the steps |
| Answer: | no |
| Question: | Would you recommend to remove all the epoxy paint from the pool, sand it, clean the surface and then paint it or to paint on top of the old paint |
| Answer: | For best results, the surface should be clean. I used a power sprayer to chip off the old paint and then filled in any dimples. Sand to ensure smooth continuity. Remember, you will have people walking on this surface, plus you want it to last. Good luck! |
| Question: | How to prep surface |
| Answer: | Pool ready paint ?.....sand all walls wash with phosphate solution le dryin for 1 hot day and paint (primer and coat) let drying for 4 to 5 daysPlaster pool ?.....patch all holes and sand all walls wash with phosphate solution le dryin for 1 hot day and paint (good primer and coat) let drying for 4 to 5 days |
Product features
In The Swim Super Poxy Shield Epoxy-Base Swimming Pool Paint
In The Swim Super Poxy Shield pool paint is the highest-quality epoxy pool coating available. A single coat lasts up to 8 years. If you are painting a bare surface, please make sure you prime the surface before rolling the Super Poxy Shield. Super Poxy Shield over an Epoxy Primer will deliver a stain-resistant, tile-like finish on the pools interior. Due to the tile-like finish, we suggest sprinkling sand on the coating before it dries for steps, shallow areas and wading pools. This will make these areas slip-resistant. Start rolling paint with the walls of the pool first and finish with the floor last. Coverage: Approximately 125 - 150 square feet average per gallon. Should be applied liberally using a 1/2" nap roller cover. Pot Life: 30 minutes at 85°F and above.
Curing Time
Curing time will vary depending on the outside ambient air temperature. If the outside ambient air temperature is 60 - 65° F cure time will be 6 days. For every 5° F lift in outside ambient air temperature that will cut a day off of the cure time.
Determine Area Size
Determining the square foot of the area you are going to paint is important. This will help you figure out how many gallons of paint are needed to complete the job. It’s important to take the surface porosity and smoothness into account. When looking at how much paint you should purchase. Start by measuring the length and width of the area. Once you have those measurements plug them into the formulas below. Divide that number by the coverage square foot of the paint you are wanting to use. That will give you the number of gallons that you should purchase. Remember to look and see if the paint requires single or multiple coats and if it needs a primer.
Drain Water
Now that you have selected the paint type and know the square footage of the interior, it’s time to drain the pool. Rent or purchase a submersible pump. As soon as the outside ambient air temperature drops below 85° F. Check the local code for where pool water can be drained and start pumping. If the outside ambient air temperature is above 85° F stop draining the pool. At these elevated temperatures, the interior surface can crack and lose its structural integrity. While the pool is draining, remember that you can start to prepare the pool for paint.
Prepare for Paint
Now that the pool has been drained, you can start to prep the interior for paint. Start by removing the perimeter return jets, pool/spa light, main drain covers, aerator fittings and any other item you don’t want painted. Using painters tape, carefully tape off all the tile line, step/bench tiles, return lines, and skimmer mouth. Once you have everything taped off it’s time to prime.
Primer Coat
Now that the pool has been drained and taped, it’s time to prime. Remember not all types of paint use a primer. So if you have paint that doesn’t use a primer, skip to the painting step. Roll the primer onto the interior surface of the pool using a 9” roller with a ½” nap, starting with the walls and ending with the floor. Once you’ve completed priming allow the prime to cure for 24 - 48 hours. Then it’s time to paint.
Painting Interior
The pool has now been drained, taped, and primed. It’s time for paint. The type of paint you choose will determine the number of coats. Start painting the walls first and finish with the floor. If the paint you are using requires a time period in between coats, make sure you take that time. It will allow the paint to cure and harden increasing its chemical resistance and life span. It is suggested for steps, shallow areas and wading pools, sprinkle sand on the coating before it dries to make the area slip-resistant.
Fill and Balance
Now that the pool is painted and the paint has cured, it’s time to fill the pool and balance the water. Depending on your area you may need to order a water truck to deliver. If you have a garden hose available, toss it in. The average pool should take anywhere from 36 - 48 hours to fill. Once the pool is full allow the fresh water to circulate for 3 - 4 hours. After the circulation period it’s time to complete the first water test of many on the new water. Make sure to test the water weekly to maintain proper water balance and overall pool health.
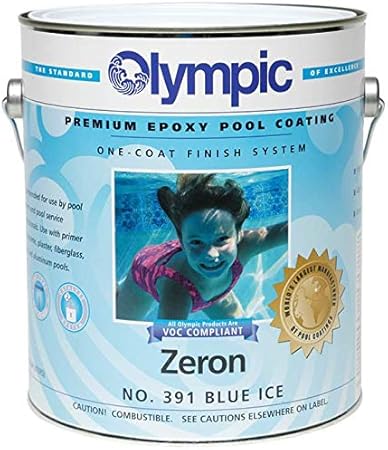
Olympic Zeron One-Coat Epoxy Swimming Pool Paint - 6 Pack Blue Ice
Product description
Epoxy pool coatings have proven to be the most effective long-range protection available for concrete pool finishes. The Zeron system is the longest lasting epoxy pool coating available. The Zeron system only requires one coat and will last up to 8 years of service from one application. Features: Premium grade One Coat Epoxy pool coatings Attractive and economically priced Easy do-it-yourself application with paint roller Specifications: One coat process Covers approx 125 to 150 sq. ft. per gallon. High Gloss finish Will stay brighter and easier to keep clean than plaster. Use this quick formula to calculate how much paint you'll need for your pool. Rectangular and Oval Pools:L x W x 1.65 = total square ft. Lazy "L" pools: L x W x 1.5 = total square ft. Free form pools: L x W x 1.6 = total square ft.
- Save Hundreds - DO IT YOURSELF!
- Premium-Grade One Coat Epoxy pool coating
- Lasts up to 8 years
User questions & answers
| Question: | Will this work for fiberglass pool |
| Answer: | I expect the weight of the dirt would collapse the hose. |
| Question: | Can it be used over previously painted gunite and fiberglass pool??? my in-ground pool bottom is gunite and walls 1/2 way are fiberglass...it's been p |
| Answer: | Yes |
| Question: | Does it come with the catalyst |
| Answer: | I bought it for an inground pool, but I don't see why it can't be used for both. They have the same function for vacuuming the pool. |
| Question: | What are the different finishes for this paint??? I prefer a flat so now so slippery....Does it come in flat finish |
| Answer: | The hose ID is 1-1/2 inch. The cuff if slightly under sized so that it will grip a barbed fitting. The collar at the cuff is nominally 2 inches. |

AdCoat Swimming Pool Paint, 2-Part Epoxy Acrylic Waterbased Coating, 1 Gallon Kit - White Color
Product description
Beautify and protect your swimming pool and decorative water features with AdCoat Swimming Pool Paint; designed to provide long lasting protection from the damaging effects of fresh or salt water. While other epoxy coatings fade and chalk when exposed to sunlight and certain interior lighting conditions, the unique formulation allows indoor and outdoor application without these signs of degradation. This two component system achieves a stronger bond to the surface with 100% pure epoxy catalyst. The addition of acrylic resin provides added durability and the versatility for outdoor application longevity. The cured finish easily stands up to strong water treatment chemicals as well as salt water exposure. The 2-parts are easily mixed and applied using standard painting methods. The product is available in standard colors (white and cool blue) but can also be ordered in custom colors on a minimum order of 15 gallons or more. For best results substrate must be properly prepared and coating allowed to dry fully before being subjected underwater conditions. Do not use over chlorinated rubber, synthetic rubber, vinyl, or acrylic substrates. +For Residential, Commercial and Industrial Applications +Satin Finish +Water Clean-Up, Environmentally Friendly +6 Hour Pot-Life +Size: 1 gallon of Material per Kit +Coverage: 300 sq. ft. per gallon +Application: Brush, Roller or Spray Equipment
- Ideal for Residential and Commercial Pools
- Additional Uses in: fountains, water ladders, slides, holding tanks, aqueducts
- 2 part epoxy -- water based acrylic
- Designed for Concrete, Gunite, Plaster & Fiberglass
- 1 Gallon Kit Covers Up To 300 Sq. Ft.
User questions & answers
| Question: | Since this is a 2-part Epoxy Acrylic coating, can it be used over a traditional acrylic paint job in the pool? Can it be used in a hot tub |
| Answer: | Typically, this coating will adhere to almost any previously painted surface that is clean, dull, dry and well-bonded. As always, applying a small test area first is ideal. This product will work in a hot tub application, if fiberglass or cement but not on an acrylic/plastic shell or new gel coat. |
| Question: | I didn't see an estimated life for this product. Does anyone have experience with how long it should last |
| Answer: | We used this on our slide this year and it looked like new all through the summer. No flaking or peeling...that's the best we can tell you. |
| Question: | Does this come with any warranty |
| Answer: | This product has a limited warranty that the coating meets manufacturer specifications. If this product does not meet these specifications, the manufacturer will, at its option and upon proof of purchase, either furnish an equivalent amount of new product to you or refund the purchase price of this product. As far as performance, an estimate of how long the coating will last is between 5-10 years when properly applied. With that being said, we have had reports of it lasting longer than 15 years! I hope this answers your question. We appreciate your interest in this product. |
| Question: | Has anyone used this on a pool slide |
| Answer: | Yes! We have had numerous customers use Adcoat's Swimming Pool Paint on slides and other similar items such as ladder steps. Proper preparation is key...clean, dull and in paint ready-condition. |
| Question: | what is the proper preparaton techinique to use before applying primer |
| Answer: | Clean pool completely! |
| Question: | Are there any special considerations for sharp inside corners like a fibre mesh |
| Answer: | Not that I am aware of. I am super pleased with our pool after painting. |
| Question: | Do I need the primer for new, virgin concrete |
| Answer: | Yes you can use it. |
| Question: | I purchased the gunite primer do I need to purchase the water base epoxy primer or do they come together? Do you need both of these to prime properly |
| Answer: | They don't come together and you don't need both. If pool is porous you need gunite. If smooth just primer. |
| Question: | Can I paint over black algae with this and have it kill off the black algae like it's interior counter part would with mold |
| Answer: | If you are using this for pool surface which will be under water I DO NOT recommend this paint as it will chip and crack in a matter of weeks. |
| Question: | Can I use this to paint a concrete and concrete block indoor shower |
| Answer: | Probably, we used ours for our pool and accidentally got some in the concrete and it does NOT come off at all ! Which could be a good and bad thing... |
| Question: | Would this work on outdoor wooden steps |
| Answer: | No. It’s a very rubbery finish since it’s meant for plaster pools. It would be slippery on outdoor steps. Even though it’s used in pools, it’s more of a slick finish when it dries. Also it’s usually expensive, much cheaper paints and stains available at the local hardware store or online. |
| Question: | Can this be painted over a concrete pool that has been previously painted and then acid washed |
| Answer: | I believe you can use this over previously painted services. The manufacture advises pressure washing first, fixing any cracks, and washing down with TSP. Clean and dry are the keys. I don't believe acid washing will do anything over previously painted concrete. Normally acid washing is to open the pours in unpainted concrete. |
| Question: | Is this acrylic based pait |
| Answer: | Yes, easy clean up latex |
| Question: | Does it say if you can use this on metal pools |
| Answer: | To the best of my knowledge, No it does not. It is very good paint that needs to be thinned but is meant for concrete pools. |
| Question: | Can this be used on fiberglass pools |
| Answer: | Yes |
| Question: | do you have to use primer first |
| Answer: | I haven’t used primer, also make sure to apply paint during the right temp, to hot and paint will bubble. Also make sure to let it cure |
| Question: | I'm got a 24' round above ground pool. it has 16 posts. i remove the ladder at the end of the season. how do i order this and what's the price |
| Answer: | We got that railing and you simply count the posts which for is 16 and tell them how many posts you have, you can order a hinged door for when you take the ladder out. |
| Question: | I have a 18' x 30' ovel shaped pool How many sctions would be required and are some curved and others stright sections |
| Answer: | All come straight but they are vinyl and be bent slightly to accommodate the curved portion of your pool my pool is a 27 round and they worked just fine. |
| Question: | Can you use these with an Intex 24x22x52” pool |
| Answer: | Yes |
| Question: | Is the panel 24" or is 24" the length of the post |
| Answer: | We bought this safety fence, the railing itself is 24” tall, and it says you should not have an opening larger than 4”, this allows you to locate it properly. |
| Question: | Can this detect motion from a dog that weighs 10 pounds |
| Answer: | Depends on how close to the alarm set dog falls in, if it doesn’t cause a wave enough to move the floating cone then it won’t sound the alarm |
| Question: | How come this doesn’t work in polls below the ground |
| Answer: | It just doesn’t work. Don’t buy us unless you have an Indoor pool because a slight breeze will sound the alarm |
Product features
Features: Secure & Reliable
- FCC Certified, Complies with CE, NF P90-307 ASTM Standards. Wireless range to 400ft, Dustproof & Water Proof Grade IP65
- 4 Different Modes To Choose From: Surveil, Swim, Mute And Off Modes. Sound alarm in just 3-13 seconds in pool 16x32sq feet.
- Main unit and Receiver sound together with light flashing to attract attention and help alert those who may be hard of hearing.
- Fewer false alarms that will not pick up movement from rain or wind.
- Alarm level: 85dB within 3.5m.
- Elegant design makes it no faulty eperation by child.
- Receiver is recommended to be with a back-up 9V rechargeable battery in case of power failure.
- Automatically activate after swimming.
- With low battery warning.
Diversified Functions:
- Audio alarm & visual alarm
- Reset function
- Automatic activation
- Low battery indication
- Yellow light indication for sleep/swimming status
- Green light indication for working status
- Red light keep flashing for alarm status
- Audio indication for status switch
- System on-off funcion
- Automatic sensiblity adjustment with wind force
Easy to install & convenience to use:
- Install directly, no need to disassemble
- Applicable for different pool base
- With adjustable sensor tube, applicable for different water leverl
- just take off the screw, battery case will pop up, easy to replace the battery
- One control buttons for all the function, no need remote controller or magnet key
Package Included:
- 1 x Solar Motion Spotlight
- 4 x Screw
- 4 x Wall Plus
- 1 x User's Guide
In The Swim Envirolon Rubber-Base Pool Paint
In The Swim Envirolon rubber-base paint is a synthetic rubber formula. Envirolon rubber-base is ideally used for gunite, plaster, and concrete surfaces. It can also be used to recoat an existing rubber-base/chlorinated rubber finish. Two coats will last up to 3 years. A third coat may be needed depending on the surface porosity. Coverage: Approximately 250 - 300 square feet per gallon. Should be applied with a 9” roller equipped with a ⅜” nap. Apply second coat at least 4 hours after the first coat. Pot Life: Indefinite as long as it is properly sealed. Allow to cure for 3 days at 70° F before filling.
Determine Area Size
Determining the square foot of the area you are going to paint is important. This will help you figure out how many gallons of paint are needed to complete the job. It’s important to take the surface porosity and smoothness into account. When looking at how much paint you should purchase. Start by measuring the length and width of the area. Once you have those measurements plug them into the formulas below. Divide that number by the coverage square foot of the paint you are wanting to use. That will give you the number of gallons that you should purchase. Remember to look and see if the paint requires single or multiple coats and if it needs a primer.
Drain Water
Now that you have selected the paint type and know the square footage of the interior, it’s time to drain the pool. Rent or purchase a submersible pump. As soon as the outside ambient air temperature drops below 85° F. Check the local code for where pool water can be drained and start pumping. If the outside ambient air temperature is above 85° F stop draining the pool. At these elevated temperatures, the interior surface can crack and lose its structural integrity. While the pool is draining, remember that you can start to prepare the pool for paint.
Prepare for Paint
Now that the pool has been drained, you can start to prep the interior for paint. Start by removing the perimeter return jets, pool/spa light, main drain covers, aerator fittings and any other item you don’t want painted. Using painters tape, carefully tape off all the tile line, step/bench tiles, return lines, and skimmer mouth. Once you have everything taped off it’s time to prime.
Primer Coat
Now that the pool has been drained and taped, it’s time to prime. Remember not all types of paint use a primer. So if you have paint that doesn’t use a primer, skip to the painting step. Roll the primer onto the interior surface of the pool using a 9” roller with a ½” nap, starting with the walls and ending with the floor. Once you’ve completed priming allow the prime to cure for 24 - 48 hours. Then it’s time to paint.
Painting Interior
The pool has now been drained, taped, and primed. It’s time for paint. The type of paint you choose will determine the number of coats. Start painting the walls first and finish with the floor. If the paint you are using requires a time period in between coats, make sure you take that time. It will allow the paint to cure and harden increasing its chemical resistance and life span. It is suggested for steps, shallow areas and wading pools, sprinkle sand on the coating before it dries to make the area slip-resistant.
Fill and Balance
Now that the pool is painted and the paint has cured, it’s time to fill the pool and balance the water. Depending on your area you may need to order a water truck to deliver. If you have a garden hose available, toss it in. The average pool should take anywhere from 36 - 48 hours to fill. Once the pool is full allow the fresh water to circulate for 3 - 4 hours. After the circulation period it’s time to complete the first water test of many on the new water. Make sure to test the water weekly to maintain proper water balance and overall pool health.
In The Swim Aqua Coat Water-Base Swimming Pool Paint
In The Swim Aqua Coat Water-Base Swimming Pool Paint is a water-based acrylic pool paint. Aqua Coat can be applied to damp surfaces. This water-based acrylic pool paint can be applied to previous acrylic coating or over rubber base paint. Versatile water-based acrylic pool paint yields a short down time of only 3 days in most cases. Requires a minimum of 2 coats on initial application. Coverage: Approximately 250 - 300 sq ft per gallon. Should be applied with a 9” roller equipped with a ⅜” nap. Apply second coat at least 4 hours after the first coat. Pot Life: Indefinite as long as it is properly sealed. Allow to cure for 2 days before filling.
Determine Area Size
Determining the square foot of the area you are going to paint is important. This will help you figure out how many gallons of paint are needed to complete the job. It’s important to take the surface porosity and smoothness into account. When looking at how much paint you should purchase. Start by measuring the length and width of the area. Once you have those measurements plug them into the formulas below. Divide that number by the coverage square foot of the paint you are wanting to use. That will give you the number of gallons that you should purchase. Remember to look and see if the paint requires single or multiple coats and if it needs a primer.
Drain Water
Now that you have selected the paint type and know the square footage of the interior, it’s time to drain the pool. Rent or purchase a submersible pump. As soon as the outside ambient air temperature drops below 85° F. Check the local code for where pool water can be drained and start pumping. If the outside ambient air temperature is above 85° F stop draining the pool. At these elevated temperatures, the interior surface can crack and lose its structural integrity. While the pool is draining, remember that you can start to prepare the pool for paint.
Prepare for Paint
Now that the pool has been drained, you can start to prep the interior for paint. Start by removing the perimeter return jets, pool/spa light, main drain covers, aerator fittings and any other item you don’t want painted. Using painters tape, carefully tape off all the tile line, step/bench tiles, return lines, and skimmer mouth. Once you have everything taped off it’s time to prime.
Primer Coat
Now that the pool has been drained and taped, it’s time to prime. Remember not all types of paint use a primer. So if you have paint that doesn’t use a primer, skip to the painting step. Roll the primer onto the interior surface of the pool using a 9” roller with a ½” nap, starting with the walls and ending with the floor. Once you’ve completed priming allow the prime to cure for 24 - 48 hours. Then it’s time to paint.
Painting Interior
The pool has now been drained, taped, and primed. It’s time for paint. The type of paint you choose will determine the number of coats. Start painting the walls first and finish with the floor. If the paint you are using requires a time period in between coats, make sure you take that time. It will allow the paint to cure and harden increasing its chemical resistance and life span. It is suggested for steps, shallow areas and wading pools, sprinkle sand on the coating before it dries to make the area slip-resistant.
Fill and Balance
Now that the pool is painted and the paint has cured, it’s time to fill the pool and balance the water. Depending on your area you may need to order a water truck to deliver. If you have a garden hose available, toss it in. The average pool should take anywhere from 36 - 48 hours to fill. Once the pool is full allow the fresh water to circulate for 3 - 4 hours. After the circulation period it’s time to complete the first water test of many on the new water. Make sure to test the water weekly to maintain proper water balance and overall pool health.
In The Swim Gunite Primer for Epoxy-Base Swimming Pool Paints
In The Swim Gunite Primer is a two-part epoxy primer typically used on fiberglass gel-coat, rough plaster, rough concrete, or sandblasted surfaces. Gunite Primer's heavy viscosity fills imperfections on the interior surface give a more uniform look. Gunite Primer should be rolled on with a paint roller. Coverage: Approximately 100-150 square feet per gallon. Should be applied liberally using a 1/2" nap roller cover. Pot Life: 4 hours at 85° F. Curing Time before rolling Super Poxy Shield 24 - 48 hours.
Determine Area Size
Determining the square foot of the area you are going to paint is important. This will help you figure out how many gallons of paint are needed to complete the job. It’s important to take the surface porosity and smoothness into account. When looking at how much paint you should purchase. Start by measuring the length and width of the area. Once you have those measurements plug them into the formulas below. Divide that number by the coverage square foot of the paint you are wanting to use. That will give you the number of gallons that you should purchase. Remember to look and see if the paint requires single or multiple coats and if it needs a primer.
Drain Water
Now that you have selected the paint type and know the square footage of the interior, it’s time to drain the pool. Rent or purchase a submersible pump. As soon as the outside ambient air temperature drops below 85° F. Check the local code for where pool water can be drained and start pumping. If the outside ambient air temperature is above 85° F stop draining the pool. At these elevated temperatures, the interior surface can crack and lose its structural integrity. While the pool is draining, remember that you can start to prepare the pool for paint.
Prepare for Paint
Now that the pool has been drained, you can start to prep the interior for paint. Start by removing the perimeter return jets, pool/spa light, main drain covers, aerator fittings and any other item you don’t want painted. Using painters tape, carefully tape off all the tile line, step/bench tiles, return lines, and skimmer mouth. Once you have everything taped off it’s time to prime.
Primer Coat
Now that the pool has been drained and taped, it’s time to prime. Remember not all types of paint use a primer. So if you have paint that doesn’t use a primer, skip to the painting step. Roll the primer onto the interior surface of the pool using a 9” roller with a ½” nap, starting with the walls and ending with the floor. Once you’ve completed priming allow the prime to cure for 24 - 48 hours. Then it’s time to paint.
Painting Interior
The pool has now been drained, taped, and primed. It’s time for paint. The type of paint you choose will determine the number of coats. Start painting the walls first and finish with the floor. If the paint you are using requires a time period in between coats, make sure you take that time. It will allow the paint to cure and harden increasing its chemical resistance and life span. It is suggested for steps, shallow areas and wading pools, sprinkle sand on the coating before it dries to make the area slip-resistant.
Fill and Balance
Now that the pool is painted and the paint has cured, it’s time to fill the pool and balance the water. Depending on your area you may need to order a water truck to deliver. If you have a garden hose available, toss it in. The average pool should take anywhere from 36 - 48 hours to fill. Once the pool is full allow the fresh water to circulate for 3 - 4 hours. After the circulation period it’s time to complete the first water test of many on the new water. Make sure to test the water weekly to maintain proper water balance and overall pool health.

INSL-X PRODUCTS WR1010092-01 Gallon White Water Pool Paint
INSL-X PRODUCTS CORP
Product description
A new generation of waterborne, acrylic emulsion pool paint, which can be applied over most types of pool coatings in good condition as well as bare concrete or plaster surfaces. Low VOC. Ocean blue pool paint. Apply over most pool paints. Chemical and abrasion resistant.
- This Product Adds A Great Value
- Apply Over Most Pool Paints
- Chemical And Abrasion Resistant
- From The Brand Name: Insl-X Products Corp
User questions & answers
| Question: | Can this product be mixed with other acrylic paints to make more colors without diminishing it's chemical bonding process |
| Answer: | I used this product on my pool and it did not adhere to the surface after all the preps I did. It started peeling off a few days later. The paint they sent me is very close to the expiration date. |
| Question: | Can I paint over black algae with this and have it kill off the black algae like it's interior counter part would with mold |
| Answer: | If you are using this for pool surface which will be under water I DO NOT recommend this paint as it will chip and crack in a matter of weeks. |
| Question: | Can I use this to paint a concrete and concrete block indoor shower |
| Answer: | Probably, we used ours for our pool and accidentally got some in the concrete and it does NOT come off at all ! Which could be a good and bad thing... |
| Question: | Would this work on outdoor wooden steps |
| Answer: | No. It’s a very rubbery finish since it’s meant for plaster pools. It would be slippery on outdoor steps. Even though it’s used in pools, it’s more of a slick finish when it dries. Also it’s usually expensive, much cheaper paints and stains available at the local hardware store or online. |
| Question: | Can this be painted over a concrete pool that has been previously painted and then acid washed |
| Answer: | I believe you can use this over previously painted services. The manufacture advises pressure washing first, fixing any cracks, and washing down with TSP. Clean and dry are the keys. I don't believe acid washing will do anything over previously painted concrete. Normally acid washing is to open the pours in unpainted concrete. |
| Question: | can i tent the paint different colors? and will it hold to metal roof |
| Answer: | Yes, I had a commercial job that required Tinting and did so by purchasing a couple of different colors in quarts to adjust the Primary Base color. I have never used Epoxy Paint on a metal roof, and would not think to use an Epoxy paint if it was rusty, or Galvanised. I used it once on a Commercial Aluminum pool inside of a hotel, but it did require a special primer to be applied first. |
| Question: | CAn this be painted on plastic pool steps to cover cracks |
| Answer: | it's not made to repair cracks but if they are only surface cracks maybe it would work. |
| Question: | Ok for salt water pools |
| Answer: | It is an epoxy paint mixed prior to use. If the pool is first washed down with fresh water an allowed ample time to dry before use, I am not aware of any reason it should not do a good job. |
| Question: | Does this product replace the plaster step? Will it waterproof concrete |
| Answer: | No it will not replace the plaster step. Not sure if it will waterproof concrete. We used it on the sides of the pool. Sides are like regular pool sides. It does waterproof them. We used a different pool paint on the concrete part of our pool |
| Question: | Will this work on a fiberglass tub |
| Answer: | No it will peel off after 1 season unless u add a sealer |
| Question: | Can you paint wood with this |
| Answer: | This stuff is good for any clean surface |
| Question: | Will this paint adhere to a metal tub |
| Answer: | If the tub is first etched and primed with paint for metal, I believe it may. This paint is designed to be used over rubber based paints. |
| Question: | We have rubber coping around our in ground pool that needs painted. Can I use this paint |
| Answer: | Yes you can! |
| Question: | Is this acrylic based pait |
| Answer: | Yes, easy clean up latex |
| Question: | Does it say if you can use this on metal pools |
| Answer: | To the best of my knowledge, No it does not. It is very good paint that needs to be thinned but is meant for concrete pools. |
| Question: | Can this be used on fiberglass pools |
| Answer: | Yes |
| Question: | do you have to use primer first |
| Answer: | I haven’t used primer, also make sure to apply paint during the right temp, to hot and paint will bubble. Also make sure to let it cure |
| Question: | Will this work for fiberglass pool |
| Answer: | With proper preparation, probably yes. Look at the Olympic (Kelly Technical Coatings) site for their application notes. |
| Question: | Can it be used over previously painted gunite and fiberglass pool??? my in-ground pool bottom is gunite and walls 1/2 way are fiberglass...it's been p |
| Answer: | Depends on the previous paint. Check Olympic's website for technical notes. I used it on a previously painted gunite pool - paint was epoxy. Before that, I had to strip the previous acrylic and rubber paints with a high pressure (3,000+ psi) washer, before the epoxy paint would stick reliably, |
| Question: | Does it come with the catalyst |
| Answer: | Yes, definitely, it is packaged in a box, paint and catalyst, 2 cans. There is room enough in the paint can to pour the catalyst, and that’s where you mix them together. Very slick. |
| Question: | What are the different finishes for this paint??? I prefer a flat so now so slippery....Does it come in flat finish |
| Answer: | My finish came out shiny. |
| Question: | Do you have to apply the cool deck coats and then another clear sealer on top of that? What kind of clear sealer do you get |
| Answer: | The COO! pool deck BUNDLE comes with one gallon of Triple Crown Cleaner and a half gallon of the SealBack Clear Sealer. SealBack is a water based acrylic sealer that is engineered for sealing the COOL! coating itself. It's water thin, delivering great penetration. We recommend 2 GOOD coats of COOL in the morning hours before temperatures get too hot (use 3/4" nap rollers) , and 2 THIN coats of SealBack during the hottest part of the day(use 1/2" nap rollers)! The SealBack sealer loves to be applied in the bright sunshine for maximum cure. Thank you and reach out to us anytime! (888) 776-2242 . |
| Question: | How long does it take for the sealer to dry |
| Answer: | Hi. Thanks for your question. In a typical application, the sealer will be dry and open for foot traffic in one hour. However, you should not apply the sealer if rain is in the 24 hour forecast. Hope this helps! We appreciate your interest in our product. |
| Question: | Can this be used on a wooden deck |
| Answer: | Hi. No. Cool is only for concrete. Thanks for your interest in our product. |
| Question: | What type of paint and how much |
| Answer: | Add 1 gallon of paint to the product. |
Product features
In The Swim Aqua Coat Water-Base Swimming Pool Paint
In The Swim Aqua Coat Water-Base Swimming Pool Paint is a water-based acrylic pool paint. Aqua Coat can be applied to damp surfaces. This water-based acrylic pool paint can be applied to previous acrylic coating or over rubber base paint. Versatile water-based acrylic pool paint yields a short down time of only 3 days in most cases. Requires a minimum of 2 coats on initial application. Coverage: Approximately 250 - 300 sq ft per gallon. Should be applied with a 9” roller equipped with a ⅜” nap. Apply second coat at least 4 hours after the first coat. Pot Life: Indefinite as long as it is properly sealed. Allow to cure for 2 days before filling.
Determine Area Size
Determining the square foot of the area you are going to paint is important. This will help you figure out how many gallons of paint are needed to complete the job. It’s important to take the surface porosity and smoothness into account. When looking at how much paint you should purchase. Start by measuring the length and width of the area. Once you have those measurements plug them into the formulas below. Divide that number by the coverage square foot of the paint you are wanting to use. That will give you the number of gallons that you should purchase. Remember to look and see if the paint requires single or multiple coats and if it needs a primer.
Drain Water
Now that you have selected the paint type and know the square footage of the interior, it’s time to drain the pool. Rent or purchase a submersible pump. As soon as the outside ambient air temperature drops below 85° F. Check the local code for where pool water can be drained and start pumping. If the outside ambient air temperature is above 85° F stop draining the pool. At these elevated temperatures, the interior surface can crack and lose its structural integrity. While the pool is draining, remember that you can start to prepare the pool for paint.
Prepare for Paint
Now that the pool has been drained, you can start to prep the interior for paint. Start by removing the perimeter return jets, pool/spa light, main drain covers, aerator fittings and any other item you don’t want painted. Using painters tape, carefully tape off all the tile line, step/bench tiles, return lines, and skimmer mouth. Once you have everything taped off it’s time to prime.
Primer Coat
Now that the pool has been drained and taped, it’s time to prime. Remember not all types of paint use a primer. So if you have paint that doesn’t use a primer, skip to the painting step. Roll the primer onto the interior surface of the pool using a 9” roller with a ½” nap, starting with the walls and ending with the floor. Once you’ve completed priming allow the prime to cure for 24 - 48 hours. Then it’s time to paint.
Painting Interior
The pool has now been drained, taped, and primed. It’s time for paint. The type of paint you choose will determine the number of coats. Start painting the walls first and finish with the floor. If the paint you are using requires a time period in between coats, make sure you take that time. It will allow the paint to cure and harden increasing its chemical resistance and life span. It is suggested for steps, shallow areas and wading pools, sprinkle sand on the coating before it dries to make the area slip-resistant.
Fill and Balance
Now that the pool is painted and the paint has cured, it’s time to fill the pool and balance the water. Depending on your area you may need to order a water truck to deliver. If you have a garden hose available, toss it in. The average pool should take anywhere from 36 - 48 hours to fill. Once the pool is full allow the fresh water to circulate for 3 - 4 hours. After the circulation period it’s time to complete the first water test of many on the new water. Make sure to test the water weekly to maintain proper water balance and overall pool health.
In The Swim CRC Pro-Series Chlorinated Rubber-Base Pool Paint
In The Swim CRC Pro-Series Chlorinated Rubber-Base Pool Paint is a self-priming paint designed as a re-coat for existing rubber-base finishes. If re-coating an existing interior, one coat is suggested. A second coat may be required on unpainted or porous surfaces. Chlorinated Rubber-Base Pool Paint has excellent chemical resistance and color retention, allowing the paint to last 3 years on average. Coverage: 250 square feet per gallon on average. This product should be applied with a 9" roller equipped with a 3/8" nap. Pot Life: Indefinite as long as it is properly sealed. Allow to cure 4 - 6 hours in between coats. Cure 10 days minimum before filling.
Determine Area Size
Determining the square foot of the area you are going to paint is important. This will help you figure out how many gallons of paint are needed to complete the job. It’s important to take the surface porosity and smoothness into account. When looking at how much paint you should purchase. Start by measuring the length and width of the area. Once you have those measurements plug them into the formulas below. Divide that number by the coverage square foot of the paint you are wanting to use. That will give you the number of gallons that you should purchase. Remember to look and see if the paint requires single or multiple coats and if it needs a primer.
Drain Water
Now that you have selected the paint type and know the square footage of the interior, it’s time to drain the pool. Rent or purchase a submersible pump. As soon as the outside ambient air temperature drops below 85° F. Check the local code for where pool water can be drained and start pumping. If the outside ambient air temperature is above 85° F stop draining the pool. At these elevated temperatures, the interior surface can crack and lose its structural integrity. While the pool is draining, remember that you can start to prepare the pool for paint.
Prepare for Paint
Now that the pool has been drained, you can start to prep the interior for paint. Start by removing the perimeter return jets, pool/spa light, main drain covers, aerator fittings and any other item you don’t want painted. Using painters tape, carefully tape off all the tile line, step/bench tiles, return lines, and skimmer mouth. Once you have everything taped off it’s time to prime.
Primer Coat
Now that the pool has been drained and taped, it’s time to prime. Remember not all types of paint use a primer. So if you have paint that doesn’t use a primer, skip to the painting step. Roll the primer onto the interior surface of the pool using a 9” roller with a ½” nap, starting with the walls and ending with the floor. Once you’ve completed priming allow the prime to cure for 24 - 48 hours. Then it’s time to paint.
Painting Interior
The pool has now been drained, taped, and primed. It’s time for paint. The type of paint you choose will determine the number of coats. Start painting the walls first and finish with the floor. If the paint you are using requires a time period in between coats, make sure you take that time. It will allow the paint to cure and harden increasing its chemical resistance and life span. It is suggested for steps, shallow areas and wading pools, sprinkle sand on the coating before it dries to make the area slip-resistant.
Fill and Balance
Now that the pool is painted and the paint has cured, it’s time to fill the pool and balance the water. Depending on your area you may need to order a water truck to deliver. If you have a garden hose available, toss it in. The average pool should take anywhere from 36 - 48 hours to fill. Once the pool is full allow the fresh water to circulate for 3 - 4 hours. After the circulation period it’s time to complete the first water test of many on the new water. Make sure to test the water weekly to maintain proper water balance and overall pool health.

In The Swim Epoxy Primer for Epoxy-Base Swimming Pool Paints - 1 Gallon
In The Swim
- Seals and preps pool interior for paint
- Thoroughly clean pool surface with surface cleaner before applying
- Required for resurfacing smooth plaster, smooth concrete or fiberglass gel-coat pools
- Epoxy Prime can be applied to damp surfaces
- Coverage: 200 - 250 sq ft per gallon on average
User questions & answers
| Question: | what is the drying time |
| Answer: | Working time an hour. Use pool in 3 days. Temp of room 65. Effects time of drying. Great product. |
| Question: | is this to prep prior to epoxy base pool paint? The water base epoxy primer is why I ask the question. Paint is not water base I assume |
| Answer: | Yes, the primer is before the epoxy base pool paint. It really is necessary if you want the finished job to look professional. |
| Question: | Can you apply paint after the primer is on after a week |
| Answer: | I would think so. We added ours after 2 or 3 days. I would brush off any debris to make sure it’s clean |
| Question: | Can any type of concrete or masonry paint be used ontop of this primer |
| Answer: | Not sure. I just used the primer and paint as a combo to keep it simple. |
Product features
In The Swim Epoxy Primer for Epoxy-Base Swimming Pool Paints
In The Swim Epoxy Primer is for use on uncoated concrete or plaster interiors. Epoxy primer soaks into the interior surface sealing and provides a surface for the epoxy paint to adhere too. Epoxy Primer can be used on damp surfaces. This will cut prep time allowing the pool to be prepped and primed in one day. It is not suggested to use the Epoxy Primer over an existing coating. In The Swim Epoxy Primer should be applied with a roller. Coverage: 200 - 250 sq ft per gallon on average. Apply this product liberally using a 1/2" nap roller cover. Pot Life: 2 hours at 90° F. Curing Time before rolling Super Poxy Shield 24 - 48 hours.
Determine Area Size
Determining the square foot of the area you are going to paint is important. This will help you figure out how many gallons of paint are needed to complete the job. It’s important to take the surface porosity and smoothness into account. When looking at how much paint you should purchase. Start by measuring the length and width of the area. Once you have those measurements plug them into the formulas below. Divide that number by the coverage square foot of the paint you are wanting to use. That will give you the number of gallons that you should purchase. Remember to look and see if the paint requires single or multiple coats and if it needs a primer.
Drain Water
Now that you have selected the paint type and know the square footage of the interior, it’s time to drain the pool. Rent or purchase a submersible pump. As soon as the outside ambient air temperature drops below 85° F. Check the local code for where pool water can be drained and start pumping. If the outside ambient air temperature is above 85° F stop draining the pool. At these elevated temperatures, the interior surface can crack and lose its structural integrity. While the pool is draining, remember that you can start to prepare the pool for paint.
Prepare for Paint
Now that the pool has been drained, you can start to prep the interior for paint. Start by removing the perimeter return jets, pool/spa light, main drain covers, aerator fittings and any other item you don’t want painted. Using painters tape, carefully tape off all the tile line, step/bench tiles, return lines, and skimmer mouth. Once you have everything taped off it’s time to prime.
Primer Coat
Now that the pool has been drained and taped, it’s time to prime. Remember not all types of paint use a primer. So if you have paint that doesn’t use a primer, skip to the painting step. Roll the primer onto the interior surface of the pool using a 9” roller with a ½” nap, starting with the walls and ending with the floor. Once you’ve completed priming allow the prime to cure for 24 - 48 hours. Then it’s time to paint.
Painting Interior
The pool has now been drained, taped, and primed. It’s time for paint. The type of paint you choose will determine the number of coats. Start painting the walls first and finish with the floor. If the paint you are using requires a time period in between coats, make sure you take that time. It will allow the paint to cure and harden increasing its chemical resistance and life span. It is suggested for steps, shallow areas and wading pools, sprinkle sand on the coating before it dries to make the area slip-resistant.
Fill and Balance
Now that the pool is painted and the paint has cured, it’s time to fill the pool and balance the water. Depending on your area you may need to order a water truck to deliver. If you have a garden hose available, toss it in. The average pool should take anywhere from 36 - 48 hours to fill. Once the pool is full allow the fresh water to circulate for 3 - 4 hours. After the circulation period it’s time to complete the first water test of many on the new water. Make sure to test the water weekly to maintain proper water balance and overall pool health.
Latest Reviews
View all
Driving Simulator Wheel
- Updated: 16.07.2023
- Read reviews

Kohler Toilet Brands
- Updated: 13.07.2023
- Read reviews

Bowling Ball For Dry Lanes
- Updated: 02.02.2023
- Read reviews

Pedal Car For Kids
- Updated: 16.04.2023
- Read reviews
Toy For 4 Year Olds
- Updated: 20.03.2023
- Read reviews